


Knowing how to react in the case of a spontaneous infant choking emergency can make the difference between life or severe complications. This guide will provide you with the basic first aid measures to ensure infant choking incidents are managed properly and safely. An approach that utilizes the infant`s structural anatomy, the signs indicating airway obstruction, and the administration of focused first aid will significantly increase the caregiver's confidence under pressure. This article sets out to provide an outline of the essential steps to systematically manage such emergencies, focusing on evidence-based principles while ensuring the infant's safety at every stage. Every parent, guardian, and childcare provider should arm themselves with this knowledge as it is crucial to ensuring infant health in critical situations.
How to Recognize When an Infant is Choking?
Careful observations are necessary for diagnosing in case an infant is choking. One of the primary indications of choking that I would look for is if they seem panic-stricken while being completely unable to cry, sound, or breathe. In addition, I look out for physical symptoms, such as the infant grasping their neck, their lips or face turning blue (cyanosis), and some signs of coughing that are too weak to clear the airway. Should the infant's chest have unusual movement or they become unresponsive, these symptoms are critical and necessitate immediate intervention. Staying calm and focused is the foremost line of action to address the issue quickly.
Signs of a Choking Infant
In the unfortunate event a toddler is choking, I know the warning signs to look for. Not being able to cry or make sounds, as well as coughing, suggests that the infant's airway is completely blocked. I would also assess for audible dyspnea or stridor accompanied by hypertension of the skin around the lips and face, which would indicate a blue state. Moreover, the infant might cross their arms over their throat or scream out in panic. If the infant is unresponsive or goes floppy, that medical emergency must be addressed urgently.
Difference Between Choking and Coughing
Choking fundamentally differs from coughing in terms of the obstruction of the airway. Though the airway is obstructed while gasping and having difficulty with the intake of breath, some airflow is present. Signs of choking are the inability to speak or make any sound, a great deal of trouble breathing, the intake of air creating a high-pitched stridor sound, and visible signs of distress. Severe choking is gasping for air and can lead to complete obstruction of oxygen supply which results in loss of consciousness and cyanosis, turning the skin a bluish tone.
On the contrary, coughing is a head-to-toe reflex designed to remove irritants like mucus or minor objects that block the airway while sustaining normal functions like breathing and speech. Effective coughing enables a person to talk and of course, the person will eject the obstruction or irritant. In medical terms, coughing is defined as forcibly expiring air from the lungs to the enlarged upper airways with speeds ranging from 50 to 500 liters per minute to help unhinge blockages. Coughing is in direct contrast to choking. Partially obstructed airways give way to powerful coughs, proving they do not block air intake fully.
In any planned response to this scenario, the cough should not be suppressed from the onset, even if it becomes weak or unproductive and shifts toward a choking scenario. At this point, certain measures must be taken immediately by performing backslaps or abdominal thrusts (Heimlich maneuver for children and adults, or specialized techniques for infants), to facilitate airway reopening. These distinctions are essential for optimal decision-making during an emergency situation—assessing patients and determining the appropriate action to take.
Understanding Choking Hazards for Infants
Infants can easily choke on small, round, complex objects blocking their narrow airways. As common safety tips, various foods such as grapes, hot dogs, cheese chunks, nuts, and small non-food items like toys, buttons, coins, and balloon pieces pose a significant risk. To eliminate risk factors, close supervision during meals is crucial, along with cutting food into soft, trim pieces, such as quartering grapes, while also ensuring that small items are not within reach.
Consider the 4-5 mm diameter of an infant's airway. According to various child safety groups like CPSC, Objects that may cause choking risks are often smaller than 1.75 inches or 4.4cm in diameter. The standard measurement is in line with the commonly used toilet paper tube measurement, which serves as a quick reference to choking hazards. These factors are essential in making the environment safer for infants.
What Immediate First Aid Steps Should Be Taken?
If an infant is choking, it is critical to act quickly and follow these steps:
- Assess the Situation
Determine if the infant is coughing forcefully or able to make sounds. If they can, encourage coughing, as this may dislodge the object. If the infant is silent, has a weak cough, or shows signs of severe distress (e.g., bluish skin or difficulty breathing), immediate action is required.
- Call for Emergency Help
If the obstruction is severe or persists, dial emergency services (e.g., 911) immediately, but do not delay administering first aid.
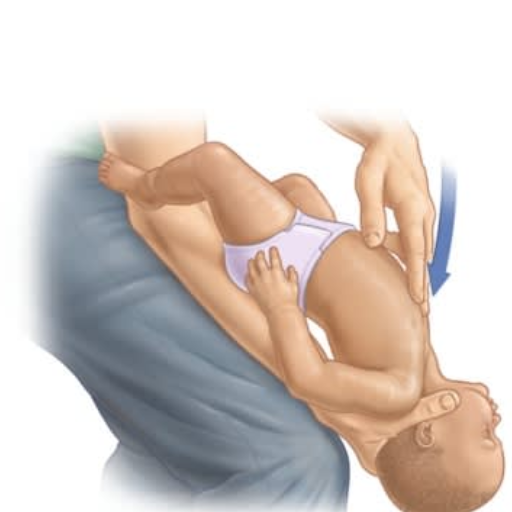
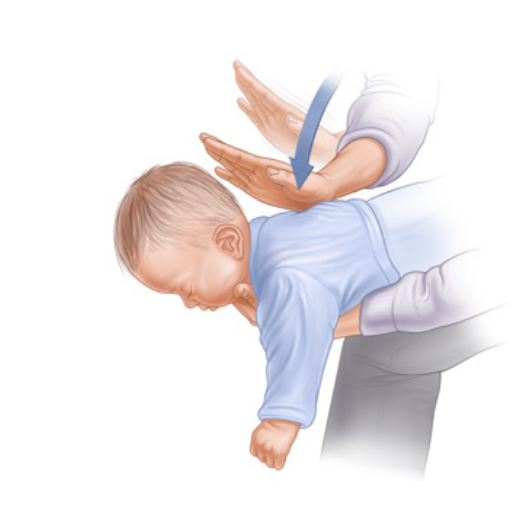
- Deliver Back Blows
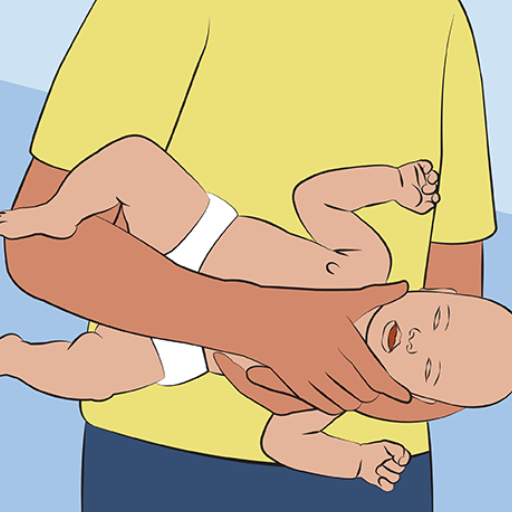
Place the infant face-down along your forearm, supporting their head and neck with your hand. Use the heel of your free hand to deliver up to five firm back blows between the infant’s shoulder blades.
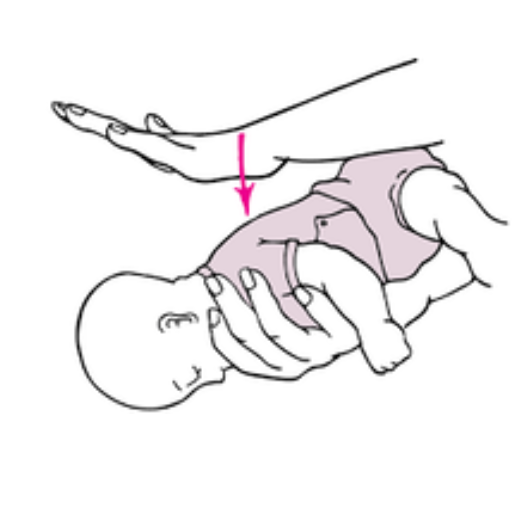
- Administer Chest Thrusts
If the object is not dislodged, turn the infant face up, resting them on your forearm or lap. Using two fingers, perform up to five chest thrusts by pressing firmly on the center of the chest, just below the nipple line.
- Repeat as Needed
Continue alternating between five back blows and five chest thrusts until the object is dislodged, the infant begins to breathe, or professional help arrives.
Avoid blindly sweeping the infant’s mouth, as this could push the obstruction further. Always seek medical evaluation afterward to ensure no further complications, even if the object is successfully removed.
How to Hold the Infant for Back Blows
To correctly hold the infant for back blows, follow these methodical steps to ensure safety and effectiveness:
- Positioning the Infant
Lay the infant face-down along your forearm so its head is lower than its chest. This position uses gravity to aid in dislodging the obstruction.
- Support the Head and Neck
Use your hand to support the infant’s head and neck securely. Ensure the neck remains in a neutral position to avoid strain or injury.
- Stabilize the Body
Rest your forearm on your thigh or another stable surface as you hold the infant. This provides additional support and control while administering back blows.
- Maintain Alignment
Ensure the infant’s body is aligned with their head and neck to prevent twisting or bending, which could cause discomfort or injury.
These parameters ensure the infant remains secure and supported during this critical first aid maneuver. Always monitor the infant closely for any signs of distress and adjust accordingly if necessary.
Executing Chest Thrusts Correctly
In order to perform chest thrusts on an infant, I would implement these steps to guarantee their safety as well as the effectiveness of the intervention.
Infant Positioning
While ensuring the infant's head is slightly below the chest level, place them on their back on a flat and firm surface. This position enhances the effectiveness of the thrusts aimed at removing the obstruction.
Find the Compression Point
Excessive force should not be used, so avoid placing extra pressure on the ribs or the xiphoid process, since this can lead to injury. Start by identifying the lower half of the sternum, around a finger width below the nipple line.
Finger Placement
To apply thrusts, place two fingers of one hand, the middle and index finger. Place your fingers on the chest so no other area is adversely affected.
Perform Chest Thrusts
Each thrust must be around 1.5 inches or 1/3 the depth of the chest. Controlled force must be used, and the compressions must be quick and focused downwards. The thrust should be rhythmic, and five should be performed at a time.
When to Call 911 During a Choking Incident
Immediate emergency assistance should be requested under the following circumstances:
- Ineffectiveness of Initial Interventions
If the airway obstruction persists despite performing back blows and chest thrusts, call 911 immediately. Time is critical in preventing severe outcomes such as oxygen deprivation.
- Signs of Severe Airway Obstruction
Dial 911 if the infant shows signs of severe choking, such as the inability to cry, cough, or breathe effectively. Cyanosis (bluish skin discoloration, particularly around the lips and fingertips) is a critical indicator.
- Loss of Consciousness
If the infant becomes unresponsive, contact emergency services immediately and proceed to CPR (if trained) while awaiting medical professionals. Regularly check to see if the obstruction has been dislodged during compressions.
- Prolonged Oxygen Deprivation
Lack of oxygen for over 4-6 minutes can lead to brain damage. Calling emergency services ensures that advanced medical intervention can be provided immediately.
Always remain calm and provide the dispatcher with precise details about the infant's condition and your exact location. This information assists responders in preparing for the appropriate measures upon arrival.
How Does Infant CPR Differ from Adult CPR?
An infant’s CPR differs from an adult’s in methodology, power, and compression depth. Instead of one or both hands in adult CPR, for infants place two fingers on the center of their chest, just below the nipple line, to deliver compressions. The compression depth of infants is around 1.5 inches (4 cm), which is less than that of adults, which is approximately 2 inches (5 cm). On top of that, the compression-to-breath ratio stays the same for single rescuers at 30:2 torso compressions. One must take care, however, not to inflict lung damage on the infant through rough rescue breathing. Aim always to keep the head tilt at a minimum for airway purposes since infant anatomy is significantly smaller.
Steps in Infant CPR
- Ensure Safety
Before performing CPR, check the environment to confirm it is safe for both you and the infant. Avoid any hazardous conditions that could impede assistance.
- Assess Responsiveness
Gently tap the infant and speak loudly to check for a response. If there is no response, proceed to call for emergency services immediately. If possible, have someone else alert emergency services while you begin CPR.
- Check Breathing
Observe the infant to determine if they are breathing normally. Look for chest movements and listen for breath sounds for no more than 10 seconds. If the infant is not breathing or only gasping, move to the next step.
- Position the Infant
Lay the infant on their back on a firm, flat surface. Their head should be slightly tilted back to open the airway, but avoid overextending the neck due to their delicate anatomy.
- Perform Chest Compressions
- Use two fingers placed at the center of the chest, just below the nipple line.
- Compress the chest to a depth of approximately 1.5 inches (4 cm) at 100-120 compressions per minute.
- Allow full chest recoil between compressions to ensure adequate blood flow.
- Perform Rescue Breaths
- After 30 compressions, provide two gentle breaths.
- Ensure a proper seal over the infant’s nose and mouth using your mouth.
- Deliver each breath over approximately 1 second, just enough to see the chest rise. Avoid delivering excessive force, as the infant's lungs are much smaller and fragile.
- Repeat the Cycle
Continue the cycle of 30 compressions followed by two breaths until emergency help arrives or the infant shows signs of life. If another rescuer is present, alternate roles every two minutes to reduce fatigue and maintain effective compressions.
- Automated External Defibrillator (AED)
If an AED is available, use pediatric pads designed for infants and follow the device's instructions. Do not delay CPR while setting up the AED.
By adhering to these structured and evidence-based guidelines, rescuers can maximize the chances of survival and minimize risks of injury during the resuscitation process.
Critical Differences in CPR Techniques
When performing CPR, a rescuer should note the age and physical development of the individual. Infants less than one year of age require compressions delivered with two fingers in the middle of the chest, below the nipple line, at a depth of around 4cm (1.5 inches). This is vastly different from adult CPR, which requires compressions at a depth of no less than 5 cm (2 inches) using the heels of both hands. Furthermore, children from 1 year to puberty can be given CPR by using one or two hands, depending on the size of the rescuer and the strength of the child, with compressions to a depth of 5cm (2 inches). About breaths, infants are to be covered over the mouth and nose, while adults and children require covering over the mouth with the nose pinched shut. These differences are crucial for the adjustment of compressions and ventilations, making them appropriate for the patient's physiology in terms of providing maximum effectiveness of CPR with minimal risk for injury.
When Should a Medical Professional Intervene?
A healthcare professional ought to intervene as soon as they are available or as soon as the situation goes beyond the capabilities of a trained bystander. Emergency medical services (EMS) should be alerted right away if the individual is not breathing, shows no signs of a pulse, or there is no improvement after CPR. In cases of severe trauma, advanced intervention with defibrillator equipment, or an underlying medical condition, a professional’s aid is critical. The appropriate handover of responsibility to medical practitioners is also highly important for further treatment and increased chances of survival.
Signs That Require Professional Help
Some of these signs call for immediate medical attention. For example, a detectable pulse and spontaneous breathing, both vital signs, will not be present and will indicate a cardiac arrest or severe airway obstruction. Skin cyanosis will indicate a critical oxygen deficit requiring immediate intervention. In addition, if a patient does not respond to routine CPR and there are signs of trauma like compound fractures with profuse bleeding and head injury, then medical assistance is necessary.
Technical standards:
- Pulse Rate: Absent or below 40 beats per minute when at rest.
- Respiratory Rate: Below six breaths per minute or not breathing at all.
- Capillary Refill Time: Greater than two seconds, which may suggest inadequate perfusion.
- SpO2 Levels: 90% or lower on a pulse oximeter.
In any case, defaulting to the emergency medical services is recommended while each parameter is present to ensure the outcome is as favorable as possible.
Role of the American Red Cross in Infant Choking Cases
The American Red Cross equips people with the training and resources necessary to deal with choking emergencies in infants. They provide Basic Life Support (BLS) and First Aid, as well as CPR training with an emphasis on back blows and chest thrusts for babies under one-year-old. These methods remove airway obstructions to minimize possible injury to kids. Furthermore, the organization has online and in-class certification courses that prepare parents, caregivers, and medical practitioners to perform critical emergency interventions. Their methodologies match primary information from prominent health institutions, which fortifies their approach to evidence-based care for underlying issues.
What to Do if the Infant Becomes Unresponsive?
It is crucial to act urgently if an infant suffers unresponsiveness as a result of choking. First, the child should be required to be put down and ascertain whether they are breathing. If intuited, chest compressions should be administered. Start by placing two fingers just underneath the nipple line, compress 30 times, and then check the throat for any visible obstructions. If you see something obstructing their air passage, use a finger sweep to retrieve it. Wrested-out items can also be pulled out with a scooping motion if the lips are forced open. After the airway is ensured to be free, tilt their head backward and replicatively supply gentle blows to administer oxygen. This should be done twice. Emergency Aid should be provided as the child resumes breathing, while the blows and compressions should be performed till the object is emitted. Depending on the situation, it may be optional or required to do both.
Steps for Handling an Unresponsive Infant
- Assess Responsiveness
Gently tap the infant’s foot or shoulder while calling their name to determine if they respond. Avoid shaking the infant as this may cause further injuries.
- Check for Breathing
Look for chest movements, listen for breathing sounds, and feel for air from the infant’s nose or mouth for no more than 10 seconds. If the infant is not breathing or only gasping, proceed to the next step.
- Activate Emergency Services
Immediately call 911 or your local emergency number. Use a speakerphone to stay on the line while performing first aid.
- Begin CPR Immediately
- Chest Compressions: Place two fingers in the center of the infant’s chest, just below the nipple line. Press about 1.5 inches (4 cm) at 100-120 compressions per minute. Allow the chest to recoil between compressions fully.
- Airway Check: After 30 compressions, carefully open the airway by tilting the head back slightly and lifting the chin. Look for any visible obstructions in the mouth or throat. If present, remove it using a sweeping motion with your finger. Avoid blindly probing as this may push the object further.
- Rescue Breaths: Take two gentle breaths, covering the infant’s mouth and nose with your mouth. Each breath should last about one second. Watch for chest rise.
- Continue CPR Cycles
Repeat cycles of 30 compressions and 2 rescue breaths until one of the following occurs:
- The infant begins breathing or shows signs of life.
- The object causing the obstruction is expelled from the airway.
- Emergency medical personnel arrive and take over.
- Monitor and Stay Alert
If the infant’s airway is cleared but they remain unresponsive, place them in the recovery position by rolling them onto their side, ensuring the airway remains open while continuing to monitor their condition.
These steps align with guidelines from authoritative sources such as the American Heart Association (AHA) and the Red Cross. To ensure proper response techniques, first aid training should be regularly updated.
Importance of Continuing CPR Until Help Arrives
Prolonged CPR until there is professional assistance is immensely vital as it guarantees the utmost oxygenated blood flow to organs, including the brain and heart, which raises the odds of living. Even stopping CPR momentarily can halt movement of the blood, decreasing the chances of survival for the victim. Keeping up with chest compressions will help sustain the chances of successful resuscitation when modern and detailed medical help is available while simultaneously avoiding damage caused by the absence of oxygen.
References
- American Red Cross - Infant Choking: How To Help
- MedlinePlus - Choking: Infant Under 1 Year
- Pediatric Partners - Choking Prevention and First Aid for Infants and Children
Frequently Asked Questions (FAQ)
Q: What should I do first if an infant is choking?
A: If an infant is choking, first ensure that emergency medical help is coming. Check if the infant is coughing or making sounds, as this may indicate that the airway is partially clear. If the infant stops breathing, begin administering first aid immediately.Q: How do I perform back blows on an infant?
A: To give back blows, lay the infant face-down along your forearm, ensuring the head is lower than the body. Use the heel of your hand to deliver up to five back blows between the infant's shoulder blades. Ensure the infant's head is supported by holding the jaw with your fingers.Q: What steps should I take if back blows do not dislodge the object?
A: If the object is not dislodged after five back blows, turn the infant face-up on your forearm or thigh for support, ensuring the head is lower than the body. Place two fingers on the center of the chest and give up to five chest thrusts.Q: How can I tell if the object has been dislodged?
A: The object may be dislodged if the infant begins to breathe, cough, or cry. If you see the object in the mouth, carefully attempt to clear the airway only if you can easily reach it.Q: What should I do if the infant becomes unconscious?
A: If the infant becomes unconscious, begin CPR immediately and continue until emergency medical personnel arrive. Ensure the airway is clear and alternate between chest compressions and rescue breaths.Q: When should I stop administering first aid to the choking infant?
A: Continue performing back blows and chest thrusts until the object is dislodged, the infant starts breathing independently, or emergency help arrives. If the infant becomes unconscious, switch to CPR.Q: Is there training available for handling infant choking emergencies?
A: Yes, organizations like the American Red Cross offer training sessions that include handling choking emergencies for infants and toddlers. This training can provide hands-on experience and confidence in emergencies.Q: What should I avoid doing during a choking emergency with an infant?
A: Avoid removing the object with your fingers if you cannot see it, as this may push it further into the airway. Do not perform abdominal thrusts on infants under age 1, as this can cause injury.Q: Can small objects pose a risk to infants and toddlers?
A: Yes, small objects like pieces of food or toys can easily cause choking in infants and toddlers. Always supervise them and keep small objects out of reach to prevent choking hazards.


 Login with Google
 Login with Facebook