


In the unfortunate event that a child below one-year-old begins choking, timely and appropriate intervention is required to stabilize the child’s condition and prevent extensive damage. This article provides a complete framework for recognizing the symptoms of choking in babies, their potential causes, and efficient first-aid responses. It also elaborates on the proper methods of administering back blows and modified chest thrusts for infants, along with significant steps that must be taken to avoid aggravating the condition. Other essential measures on how to keep calm and seek professional help when needed, as well as steps to prevent choking incidents in everyday life, are also discussed in detail. The author intends that caregivers feel more confident attending to this potentially debilitating problem after reading the tips and following the procedures described here.
What First Aid Steps Should You Take if a Baby is Choking?
If a baby is choking, it is essential to act quickly and methodically. Follow these first-aid steps:
- Assess the Situation: Confirm if the baby is choking by looking for signs such as difficulty breathing, silent coughing, or bluish skin.
- Call for Emergency Help: Call emergency services immediately to ensure professional assistance is coming.
- Perform Back Blows:
-
-
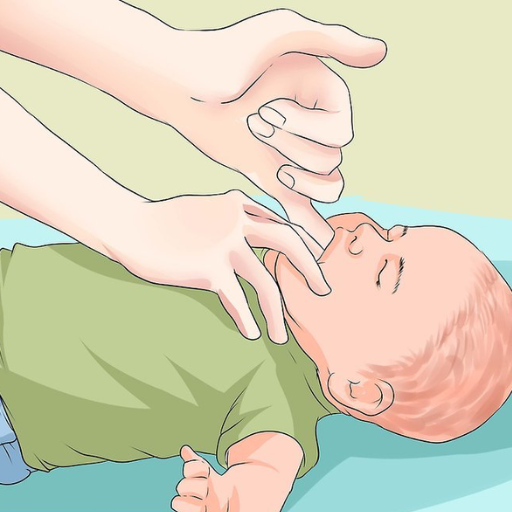
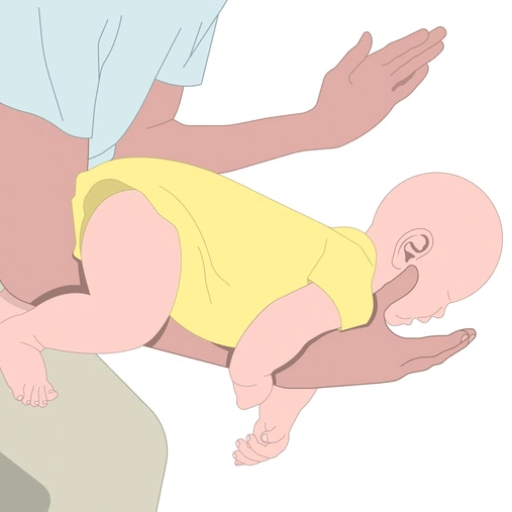
- Support the baby’s head and neck with one hand and lay them face-down along your forearm.
- Use the heel of your free hand to deliver up to five firm back blows between the shoulder blades.
-
- Administer Chest Thrusts:
-
-
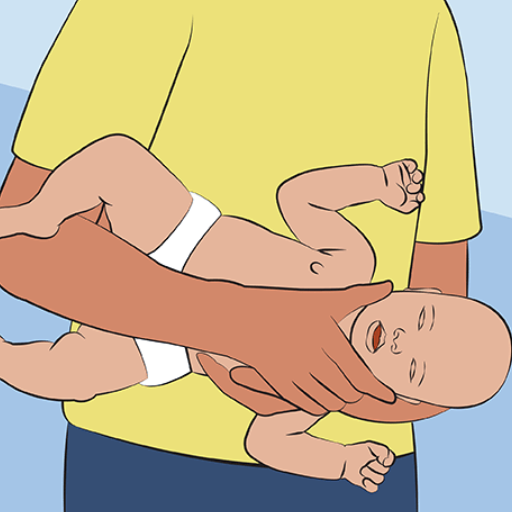
- Turn the baby face up, keeping their head lower than their chest.
- Place two fingers at the center of the chest, just below the nipple line, and perform up to five quick compressions.
-
Repeat the back blows and chest thrusts alternately until the object is expelled or the baby begins breathing normally. Avoid any blind finger sweeps, as these may push the object further into the airway. If the baby becomes unresponsive, initiate CPR and continue until help arrives.
How to Identify a Choking Infant
In an infant, which is roughly within the age scope of 0-1 years, I will be looking at more notable signs of airway obstruction, such as the baby being unable to scream or cough, having difficulty breathing, or even showing some form of struggle at breathing in the surrounding air. Their skin, especially around the lips or face, may appear to develop bluish or grayish skin due to the lack of oxygen reaching the body. Besides that, I will also pay attention to whether the infant is showing signs of panic, such as clutching their throat while moving their hands in a panicked manner. In most situations, attempting to cry or cough while remaining silent is a dire sign. Continually assess the infant without haste and take measures to unblock the airway where possible.
When to Call a Doctor?
Patients with infants in distress should always be prepared to render a life-saving intervention; below are immediate action guidelines detailing when to call for physician interference or any emergency intervention.
- Moderate Difficulties in Respiration: If health indicators suggest that the infant is anxious and wheezing/resting with little difficulty breathing while having an obstructive draught, the initial steps should involve ending the effort to assist in removing the blockage.
- Physical Non-Response: A parent or caregiver should be worried if a baby appears comatose or is unresponsive to a caregiver during a situation where they should, and a caregiver or parent should be concerned about those states.
- Bluish Tint on the Skin: Significant amounts of oxygen could be missing, leading to bluish skin with a definite lack of blood, especially around the lips, face, and fingernails.
- Object Stuck and Thrusts have No Effect: The professionally established rudimentary form of first aid where a patient where a kid undergoing said routine would face five consecutive thumping blows to the back with ENSUING five joy thrusts.
- Symptoms After Restriction of Breathing: An infant post obstruction removal is likely to cough, tend to sleep, display a rough voice, or vomit, and the following situation demands medical analysis to confirm trim to no water plus food was inhaled while being beneath drowning out.
Severe and proactive measures like infection or suffocation are as deadly as giving the subject no aid after drowning out without eliminating critical aspects, which mark a child in danger, such as worrying signs showing fatigue. The self-defeating cycle can be avoided if law enforcement is summoned ultimately, and, as alluded, diagnosis is rest-prioritized with no proof when more serious symptoms appear.
How can you clear the airway of a choking infant?
To get the breathing passage of the infant who is choking, here are steps you need to take:
- Practical evaluation – Check to see if the infant is choking and if they are unable to breathe, weep, or make sounds. Along with choking, some other signs can be blueness in the skin and ineffective coughing.
- Give blows to the back – While placing the infant face down, rest the infant on your forearm while supporting the neck and the head. Five strong blows should be imposed with the heel of the hand between the shoulder blades of the infant.
- Perform the thrusts to the chest – If the blockage still occurs, turn the infant on their back and place her on the lap or forearm. With two fingers placed just below the nipple line in the middle of the chest, administer five quick chest thrusts. Allow the chest to recoil between thrusts as you compress about 1.5 inches deep.
- If necessary, repeat your efforts. Switch between five blows to the back and five thrusts to the chest until you see the item is thrown out or the infant starts to breathe or cough.
- Now, professional assistance – Emergency services should be called. Until help arrives, continue doing what you have described above.
When receiving training on first aid for infants, it is essential to focus on the method so that you do not cause damage.
Recognizing Signs of Airway Obstruction in Infants
Recognizing signs of airway obstruction in infants is essential for taking appropriate and timely action. Noted signs include:
- Audible Signs - Listen if sounds such as wheezing, stridor (a high-pitched sound during breathing), or soundless breathing are present even when the child is visibly attempting to breathe.
- Seeing Struggle: - The child may show signs of distress while breathing, which may include heavy breathing, movement of the chest in an exaggerated manner, or the hoarding of extra muscles such as retractions (which is the visible pulling of the chest and neck muscles while trying to breathe).
- Skin Changes - Bluish discoloration of the skin, particularly lips or fingertips, (Cyanosis) can be a sign for poor oxygenation.
- Absence of consciousness—Failure to respond or sudden unconsciousness may suggest the presence of further severe breathing obstruction.
- Gagging or Coughing: - Overwhelming or fervent efforts to cough or gag can indicate a blockage. However, one may ultimately cough to suggest a total meshing.
Corresponding Technical Parameters:
- Respiratory Rate:
- Normal for infants (0-12 months): 30-60 breaths per minute.
- Breaths per minute below 30 or above 60 may indicate distress.
- Oxygen Saturation Levels:
- Normal SpO₂ range for infants: 95%-100%.
- Readings below 90% reflect hypoxemia, requiring immediate attention.
Caregivers and healthcare professionals must remain vigilant for these indicators and swiftly intervene when signs of obstruction are detected. Early recognition and proper action are critical to the infant's survival and recovery.
Step-by-Step Guide to Performing Back Blows and Chest Thrusts
When an infant is suspected of choking, executing back blows and chest thrusts promptly and correctly can be life-saving. Below is a detailed guide based on established guidelines, compiled concisely for ease of application.
Back Blows Procedure:
- Position the Infant:
-
-
- Place the infant face down on your forearm, ensuring that their head is lower than their chest.
- Use your thigh or lap for support while stabilizing the infant’s body with your hand.
-
- Head and Neck Support:
-
-
- Firmly support the infant's head and neck with your hand, ensuring the airway is unobstructed but aligned.
-
- Administer Back Blows:
-
-
- Using the heel of your free hand, deliver five firm back blows between the infant’s shoulder blades.
- Ensure the blows are adequate to create airflow and potentially dislodge the obstruction.
-
Chest Thrusts Procedure:
- Reposition the Infant:
-
-
- Turn the infant face up on your forearm or lap, keeping their head lower than their chest. This position uses gravity to aid the expulsion of the object.
-
- Locate the Correct Spot:
-
-
- Place two fingers just below the imaginary line connecting the nipples, at the chest's center (over the breastbone's lower half).
-
- Perform Chest Thrusts:
-
-
- Apply five quick compressions by pressing down approximately 1.5 inches (4 cm) at a consistent rhythm, allowing for recoil.
- Use controlled force to avoid injury while ensuring adequate pressure.
-
Alternate Between Back Blows and Chest Thrusts:
- Repeat the sequence of five back blows and five chest thrusts, alternating until the object is expelled or the infant becomes unresponsive.
If the Infant Becomes Unresponsive:
- Activate Emergency Response:
-
-
- Call emergency services immediately or have someone else call while you perform resuscitative measures.
-
- Begin CPR:
-
-
- Confirm no signs of breathing or pulse, and initiate CPR as per infant guidelines. This includes 30 chest compressions followed by visual inspection of the airway and two rescue breaths.
- Avoid "blind sweeps" of the infant’s mouth, which may worsen the obstruction.
-
Critical Notes:
- Always ensure your actions are precise and measured to avoid additional harm.
- Trust trained healthcare providers for further intervention as soon as emergency services arrive.
This guide is derived from best practices recommended by authoritative sources such as the American Heart Association (AHA), Red Cross guidelines, and reputable pediatric health institutions. To reinforce skill reliability, ensure routine competency checks through certified infant CPR and first aid training.
How to use?
For first aid in an emergency scenario of choking in infants, I seek to achieve the following objectives:
- Assessing the situation: If an infant cannot cry, cough, or breathe, I would confirm that the airway is obstructed.
- Administering back blows: I position the baby face down over my antecubital forearm with their head lower than the chest. While using my arm to support the child’s body, I deliver five powerful blows to the back of the baby, targeting the upper back near the shoulder blade towards the midsection.
- Performing chest thrusts: After the obstruction has not been resolved, I would recline the baby onto the back with the head lower than the chest and use the heel of my palm for the thrust. With the fingers on the trapezius, use two or three fingers to thrust five times toward the center of the chest, slightly below the nipple.
- As needed: Alternating between five back blows and five chest thrusts, I wait for the baby to start breathing or for the object to get dislodged.
- Activation of emergency services: If several complete cycles are ineffective, I would initiate a call for emergency services.
Technicals Parameters:
- Back blow force is the effort needed to dislodge an object without causing injury. It is essential to maintain some control to avert trauma.
- Chest thrust positioning: Thrusts should be placed at mid-chest and below the nipple line at around 1.5 inches for an infant for precision.
- Baby’s Angle: While performing the technique, lower the infant’s head below the level of his/her chest to utilize gravity.
- Time Constraints: When an obstruction becomes stuck, make repeated efforts for a maximum of two minutes without outside assistance.
These instructions, derived from the authoritative group on first aid for small children, stress the necessity of expeditious action and the use of very controlled movements to reduce potential harm while enabling the obstruction to be removed.
Steps for <5 Back Blows> and <5 Chest Thrusts>
- Position the Infant: Hold the infant face down on your forearm. Support the head and neck with your hand. Use your thigh or lap to ensure proper positioning while keeping the infant’s head lower than their chest.
- Deliver 5 Back Blows: Deliver five forceful blows to the infant's back just beneath the shoulder blades. Ensure each blow is distinct and assertive enough to dislodge the obstruction.
- Reposition for Chest Thrusts: Roll the infant on its back and rest it alongside your forearm or thigh while keeping its head lower than its chest. Use your hand to support the head and neck gently.
- Perform 5 Chest Thrusts: Locate the midpoint of the baby’s chest just below the nipple line and place two fingers vertically on it. Perform depth thrusts of approximately 1.5 inches, with the chest returning to its original position between thrusts.
- Repeat as Necessary: Perform alternate sets of 5 back blows and five chest thrusts until the object is dislodged or until the infant usually breathes. If the obstruction remains after two minutes, seek emergency help immediately.
You should remember to always concentrate on the technique and speed while maneuvering to avoid causing any injuries. Always remember not to use any needless force that can worsen the already acute injury.
Positioning the Infant Correctly
Whenever there's a case of a choking infant, all the moves you make must guarantee the highest degree of safety; this will assist you in effectively helping the infant. To recommend the proper positioning for the infant, follow these straightforward steps:
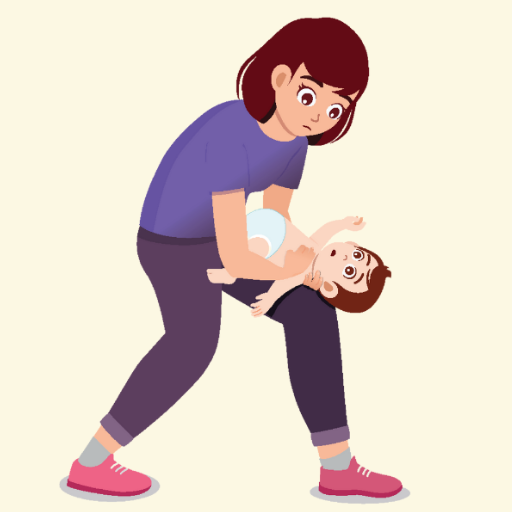
- Heading Position for Back Blows: The infant should be placed along your forearm. His head should be lower than his chest. Use your hand to support the infant’s head and jaw, maintaining their airway clear. This position aids in dislodging the object whilst performing the back blows when the angle is tilted.
- Body Stability: Position the thigh at the bottom of your forearm to form a base where the infant can rest. This added stability means all the risk of dropping the infant will disappear along with the throttled controlled application of back blows or chest thrusts. To wreak further injury to the infant, make sure his head and neck are stable enough to support the infant.
- Head Position for Chest Thrusts: The infant should be back placed while remembering to position him along your opposite forearm. Like the rest of the motion, the infant’s head should again be lower than his chest. Grab hold of the base of the infant’s head and neck with your hand while firmly grabbing hold of him to secure him.
- Inclination Angle: The most effective approach in performing back blows and chest thrusts on an infant is maintaining an inclination angle of 15-30 degrees downwards. This angle also utilizes gravitational force to help dislodge the obstruction.
Following these steps will allow a caregiver to minimize the risks and complications of removing an infant's airway obstruction. It is always advisable to stay calm and composed during the entire procedure, and if there is still no sign of breathing, emergency help is needed urgently.
Using Effective Thrusts
In conducting chest thrust, I position two of my fingers at the center of the infant’s chest, just below the nipple line. I ensure that the strength of the thrusts is controlled and sufficient for the obstruction to be removed without incurring any damage. The Infant is always maintained at the proper incline angle, and each thrust is delivered while stepping down. Unless emergency services arrive, it is imperative to perform an alternation between back slapping and chest thrust until the infant is unblocked. I know how important it is to support my efforts with decisive and immediate actions to shift the chances of success while maintaining the utmost safety for the infant.
What to Do if the Unresponsive?
When the infant displays no signs of responsiveness, one should immediately commence CPR and contact emergency health services. Start with 30 chest compressions using two fingers at the center of the chest below the nipple line at a depth of about 1.5 inches. This should be done at 100 to 120 compressions per minute. After providing the compressions, open the airway by tilting the head backward while pulling the chin upward and then give two rescue breaths. Continue repeating the cycle of breaths until visible signs of obstruction in the mouth are checked. If possible, remove the obstruction. Maintain CPR until recovery signs can be identified on the infant or when emergency medical services arrive at the scene.
Commencing on an Infant's Care in Emergencies
To care for an unresponsive infant, I will follow infant CPR Instructions as a reference from americanheart.org or redcross.org. I will always perform the correct 30 chest compressions at 1.5-inch depth with two fingers, followed by opening the airway and delivering two rescue breaths. I will repeat the process while checking for obstructions and ensuring emergency services are coming. These steps conform to the instructions given by the Red Cross and the American Heart Association.
Signs and How to Respond
Recognizing the signs of an unresponsive infant is critical for prompt action. Common indicators include an absence of movement, unresponsiveness to stimuli, and abnormal or absent breathing. To respond effectively:
- Check for Responsiveness
-
-
- Gently tap the infant’s foot or shoulder and call their name. Observe for any reaction.
-
- Assess Breathing
-
-
- Look for chest movements and listen for air exchange (no more than 10 seconds). Normal breathing should be consistent and unlabored.
-
- Initiate CPR if Necessary
-
-
- If the infant is unresponsive and not breathing, begin CPR. Perform 30 compressions at a rate of 100-120 compressions per minute with a depth of approximately 1.5 inches using two fingers. Follow with 2 gentle rescue breaths lasting about 1 second each.
-
- Call Emergency Services
-
-
- Ensure emergency help is contacted immediately if another person is present or after 2 minutes of CPR if you are alone.
-
- Monitor for Obstructions
-
-
- Check the airway to see if visible objects obstruct it, and remove them cautiously if safe. Avoid blind finger sweeps, which might push the object further.
-
Following these procedural steps ensures compliance with established standards, helping to maximize the chances of resuscitation and recovery.
Continuing Efforts Until Help Arrives
I will carry on with CPR uninterrupted, performing cycles of 30 chest compressions followed by two rescue breaths. Every so often, I will look for any breaths or movements to check if the victim is alive. If I can see anything blocking the airway, I will remove it, but only if it is safe. I will stop these actions only if the infant responds, professional assistance comes, or I can no longer continue.
What is the Role of Professional Responders in Managing a Medical Emergency?

Professional responders' goal in a medical emergency is to achieve further medical management and the patient’s stabilization. They specialize in situations requiring assessment, critical condition intervention, and hyper-specialized techniques such as defibrillation and intubation. Their rapid actions, in concert with the initial bystander intervention, significantly increase the chances for survival and recovery built through coordinated and skillful actions.
Benefits of Early Intervention in a Medical Emergency
The links and benefits of primary intervention in a medical emergency are essential, but offspring worry about complications. A prompt smoothing action on the patient lowers the risk of other physiological problems and death. Steps such as CPR or remediating airway blockages take time till professional responders take care of the patient. This proactive measure goes beyond the physical support offered to the victim and works to prevent deterioration. Furthermore, suppose early intervention is performed when required. In that case, it ensures that emergency medical personnel do not have to tell the bystander to «stop everything» and just chime in on the action.
References
- American Red Cross - Infant Choking: How To Help
- MedlinePlus - Choking first aid for infants under 1 year
- Mayo Clinic - Choking: First aid
Frequently Asked Questions (FAQ)
Q: What should I do first if a choking infant cannot cough?
A: If a choking infant is unable to cough, immediately give 5 back blows followed by 5 chest thrusts. Hold the infant face-down along your forearm, supporting the head lower than the body, and use the heel of your hand to deliver the back blows between the shoulder blades. If the object is not dislodged, turn the infant over and give 5 chest thrusts.Q: How do I properly perform back blows on a choking infant?
A: To perform back blows on a choking infant, place the baby face-down along your forearm, supporting the head and neck. Use the heel of your hand to give up to 5 quick, firm back blows between the infant’s shoulder blades.Q: When should I call a medical professional during a choking incident?
A: Call a medical professional immediately if the choking infant becomes unconscious or if the object is not dislodged after several cycles of back blows and chest thrusts. It's crucial to seek emergency help to save lives.Q: How can I perform chest thrusts on an infant under 1 year old?
A: To perform chest thrusts on an infant under 1 year, lay the baby face-up on your thigh or lap for support. Use two fingers to press on the chest in the middle of the breastbone, just below the nipple line. Give five chest thrusts with quick, downward movements.Q: What should I do if the choking infant becomes unresponsive?
A: If the infant becomes unresponsive, start CPR immediately. This involves giving chest compressions and rescue breaths. Follow basic life support guidelines or your Red Cross training until help arrives.Q: Can I use abdominal thrusts on a choking infant?
A: No, abdominal thrusts are not recommended for infants under 1 year old. Instead, use back blows and chest thrusts to help clear the airway.Q: How can I prevent choking in an infant?
A: To prevent choking in an infant, keep small objects out of reach and supervise infants and toddlers during meals and playtime. Be aware of items the baby has placed in their mouth, and ensure that toys are age-appropriate.Q: Why is keeping the infant's head lower than the body during back blows important?
A: Keeping the infant's head lower than the body during back blows helps to use gravity to assist in dislodging the object from the airway. This position allows any small object to move out of the throat more easily.Q: Where can I find additional resources on choking infant first aid?
A: For more detailed information, refer to resources like the American Red Cross training or the MedlinePlus Medical Encyclopedia. These provide comprehensive guidance on emergency steps and first aid advice for handling an infant's choking.


 Login with Google
 Login with Facebook