


Infants under the age of one year can face dire consequences such as suffocation, oxygen deprivation, or even death if immediate measures are not taken; thus, this is deemed as a medical emergency that needs to be converged upon at the earliest with an effective plan. This document intends to provide a parent, caregiver, or even a first responder with the necessary information on handling such emergencies and step-by-step instructions so they can act swiftly and without panic. The article will discuss critically essential components such as the various signs of choking, methods to perform back blows, chest thrusts, and, crucially, when it’s time to seek help from an actual medical practitioner. Through mastering these vital techniques, readers can be self-assured of their capabilities to act efficiently during highly stressful scenarios.
What are the signs of a choking infant?
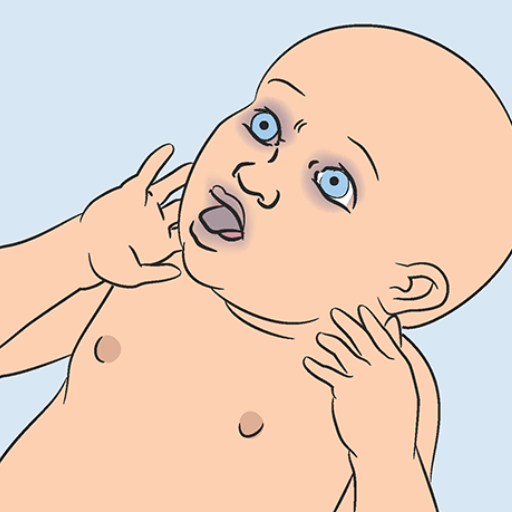
Determining whether an infant is choking is essential in deciding how much time you have to act to provide help. Some signs are inadequate breathing, poor or no crying, stridor, and cyanosis or pallor, especially of the face and lips. Infants may also show signs of distress, cough excessively, gag, or struggle to swallow. If the infant’s airway is completely blocked, they may be silent and unable to breathe, which calls for immediate action.
Recognizing severe airway obstruction in infants
My focus when detecting increased airway obstruction among infants is identifying features needing immediate intervention. The inability to cry, cough, or make any sound clearly indicates an entirely blocked airway. I also look for cyanosis, bluing the skin or lips, and increased effort in breathing, like chest retractions or flaring of nostrils. If the infant appears to be panicking while staring in a glassy-eyed fashion and then starts to faint, these are all critically obstructed level signs that require urgent remedial action. Such states call for the performance of back blows and chest thrusts while emergency medical intervention is sought.
Differentiating Between Choking and Coughing
Knowing the difference between coughing and choking is essential when it comes to providing proper care and assistance. Coughing is a reflex action that the body self-initiates to eliminate any interferences in the respiratory passage, such as mucus, dirt, and food. While coughing, the airway is kept at a state of partial closure, meaning individuals can still breathe, talk, or make noises. A person who coughs audibly while still exhibiting visible breathing actions is not suffering from complete airway obstruction.
Choking is when a foreign object blocks the airway either regionally or entirely. Some principal signs of choking include hoarseness, silenced speech, absence of sincere crying, and strenuous coughing in partially obstructed airways. When speaking of total closure, patients often show a few visible signs like silence, distressing acts like clutching one’s throat, cyanosis, as well as shortness of breath.
Some of the technical specifications that help distinguish between the two are:
- Coughing—Different age brackets, coupled with varying levels of lung capacity, mean that the approximate airflow during heightened coughing will be between 80 and 160 liters per minute.
- Choking - Partial obstruction: A reduced flow rate during stridor suggests that fogs are drawn, increasing the stridor remaining lower than 40 liters.
- Choking – complete obstruction: A state wherein airflow during exhalation and the ability to make sounds is guaranteed is concentrated enfeebled.
A correct answer stems from recognizing the problem: vigorous coughing to clear an obstructed throat or using back blows and chest thrusts to relieve choking. Any complete airway blockage not relieved within a few seconds requires immediate attention.
When to act quickly in infant choking emergencies
In cases of infant choking, it is essential to act quickly. I know intervention is required if I notice difficulty breathing, weak or absent crying, bluish skin (cyanosis), or an absence of effective coughing. For partial obstruction, I ensure the infant attempts to cough as much as possible to clear the airway. Unfortunately, if there is no adequate airflow or sound, I accompany coughing with back blows and chest thrusts and apply the following parameters:
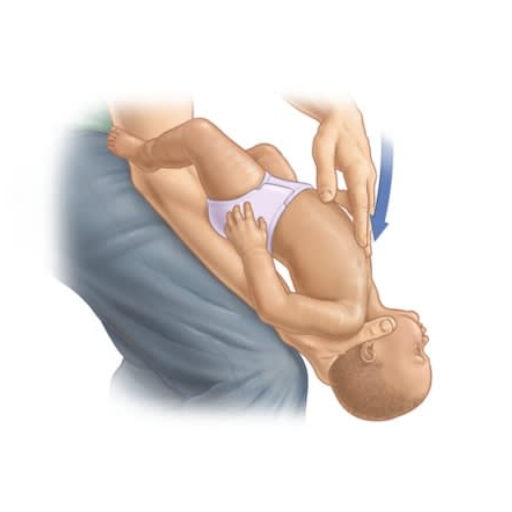
- Back blows: While the infant is being supported on my forearm, I bring attention to the fact that they should be facing down, and subsequently, using the heel of my hand, strike between the shoulder blades in 5 firm blows.
- Chest thrusts: I apply two fingers to the lower half of the sternum and, with them, deliver five thrusts, compressing 1.5 inches (4 cm) downward.
Thus, I am consistently alternating back blows with chest thrusts till either emergency services arrive or the obstruction is removed. In this predicament, I know the most important factor is preventing hypoxia and restoring airflow.
How to care for a responsive choking infant?
To save an infant experiencing a responsive choking case, immediate and precise intervention is necessary. Initially, look into the issue at hand. In case the infant can cough usually, assist them further as it helps to clear the airway. But if there is a case where the infant is unable to cough, cry, or breathe properly, start applying a sequence of back slaps combined with chest thrust (chest thrust CPR). For the back slaps, place the infant on your forearm, with their body facing down and head lower than the chest. Then, between the shoulder blades, pick an area and deliver five firm slaps. Next, while assisting the infant in the standing position, perform five compressive thrusts by placing two fingers toward the lower part of the chest bone and squeezing out the lower half of the sternum around 1.5 inches or 4 centimeters deep. And change between these strategies until medical or otherwise help is supplied. Finally, relax so that effective action can be taken without further distressing the infant.
Proper positioning of the infant for back blows
Here's how to set an infant that is choking on something and needs back blows:
- Head and Neck Supporting: With one hand, cradle the child’s backward-facing lower jaw and cover their face, ensuring their head is below the rest of the body. This allows gravity to assist in getting rid of the obstacle. At the same time, ensure the head and neck are well supported. Now, place the child’s front body facing down to your arm.
- Stability: Providing additional support will now add control to your movements. Place your arm or thigh on a stable surface. This is to rest the arm on so movement isn’t entirely restricted.
- Body Positioning: Elevate the infant’s head so that it was lowered under the chest previously. This advancement helps the object out of their airway during the blows.
- Back Blow Positioning: Once the positioning has been achieved, identify the space under the child’s shoulder blades. Strike this location with the heel of your hand, backing smooth but solid blows.
Following these steps guarantees the continuation and purpose of the process is done without further complications, harm, or injury.
Executing effective back blows and chest thrusts
I do the following to ensure that back blows and chest thrusts are effective. While the infant is in a head-down position, I give five back blows with the heel of my hand between the infant's shoulder blades. Once I do this, I turn the infant over to its back, fully supporting the head, and then provide five chest thrusts. Chest thrusts are executed by positioning two fingers in the middle of the chest under the nipple line and giving sharp compressing thrusts downwards. The infant is alternately supported head up and down until the clean air passes through or while waiting for emergency assistance.
Alternating between back blows and chest thrusts
The combination of alternating back blows with chest thrusts is strenuous and needs a high level of skill to be effective. I ensure that throughout the procedure, the position of the infant’s body is maintained in a way that it is parallel to the ground, and the head is placed lower than the chest to ensure maximum assistance by gravity. I apply back blows with controlled force to the area between the shoulder blades. In between thrusts, I allow the chest to recoil fully. During the thrusts, I apply two finger compressions at the center of the chest (below the nipple line) at a depth of approximately 1.5 inches (or 4 cm). I do so while ensuring that there is full chest recoil between thrusts. I repeat this sequence of 5 back blows followed by five chest thrusts in this way as long as the obstruction is present or until emergency personnel arrive. This technique optimally balances the infant’s risk of trauma and the probability of removing the airway obstruction.
What should you do if the infant becomes unresponsive?
Place the child on a flat, solid surface if the infant becomes unresponsive. If emergency services have not already been notified, place the call now. Begin cardiopulmonary resuscitation (CPR) with cycles of 30 chest compressions and follow with two rescue breaths. Each compression should be done to roughly 1.5 inches (4 cm) depth. Ensure that you perform compressions at a rate of 100-120 per minute and that the chest fully recoils between compressions. After each set of compressions, check the airway and remove any visible obstructions that can be extracted without further injury. Continue CPR until the obstruction is removed, the infant starts breathing normally, or trained professionals intervene.
Transitioning from Choking First Aid to Infant CPR
Adequate first aid procedures can be employed if an infant remains unresponsive due to asphyxiation or choking. The infant should be positioned with their face towards the ground and on a rigid surface with the head remaining tilted back. Ensure medical personnel are contacted or informed if they are already present.
Extending the time frame and increasing the breaths up to two with their breaths covering both the mouth and nose with the infant's head in a neutral position (tilted backward). The infant must be vertical. Before the breaths, the 30 compressions must be conducted to the chest at a place of about 4cm with a rate of 100 to 120 compressions per minute. These measures are targeted at aiding blood flow around the body.
Swing your finger in a rotating manner to grab and remove any visible obstructions to clear the infant's airway after every breath and chest compression. Furthermore, the infant should be placed in a vertical position and rescue breaths and chest compressions until one of three situations occurs: an obstruction-free airway, self-initiated respiration from the infant, or the professionals arriving to assist.
Remember that the goal is to alleviate the obstruction while striving to remain calm and composed. The base goal is to increase their chances of returning to life. So long as the measures are evidence-based, there should be no issues.
Performing chest compressions on an unresponsive infant
Before initiating chest compressions on the unresponsive infant, I first needed to place the infant on a flat and firm surface. I would then position myself such that the midpoint of the chest, which is the area below the nipple line, is near my two fingers. I would then push downwards using a force proportional to a depth of 1.5 inches (4 cm). Throughout this process, I would maintain a rate of 100-120 compressions per minute while allowing for complete chest recoil between compressions. The compressions should have a smooth and even flow, being maintained constantly unless for switching breaches or checking for responsive signs. This approach is consistent with optimal management of the unresponsive infant.
When and how to give rescue breaths
In providing rescue breaths to an unresponsive infant, I would start by opening the airway using the chin lift maneuver. Afterward, I would place my mouth over the infant's mouth and nose to create a seal. Then, while watching the infant’s chest to confirm ventilation, I would slowly give breaths, and the infant’s chest should rise. Each inhalation should last for around a second. If I had to do CPR on the child, I would give two breaths after every thirty compressions. Care should be taken to ensure that the infant is not over-inflated, as this could induce gastric distention or lower the compliance of the lungs. For maximum inhalation effectiveness, breaths need to be adequate yet unobstructed. These instructions have been outlined in the AHA and other such organizations concerning their CPR protocols for infants.
How can you prevent choking in infants?
Caregivers should always be present during feeding sessions to avert the risk of choking in children and ensure the child is seated. Exercise caution while giving small round-shaped food items like nuts, grapes, or even pieces of hot dogs since they can pose a choking hazard. The food’s size and texture should always be appropriate to the child’s developmental stage. Furthermore, children’s surroundings should regularly be checked for small dangerous objects that can be ingested. Child-safe toys that do not pose choking risks should be given since they help reduce such risks. Caregivers should also be trained to react and prevent emergencies, such as giving back blows or chest thrusts.
Identifying common choking hazards for infants
Common choking hazards for babies can be divided into two categories, namely food-related hazards and non-food-related hazards. The food-related risks include small, hard, round, or sticky food components. Examples include whole grapes, popcorn, nuts, hard candy, raw vegetables, and hot dogs. Risks should be mitigated by softening food before it is given to experts when eating solid food. In addition, food should be cut into pieces no more significant than 1/2 inch in diameter.
Non-food-related hazards entail small items such as coins, button batteries, marbles, beads, and small parts of toys that are less than 1.25 inches in diameter, as defined by the United States Consumer Product Safety Commission (CPSC). Soft objects such as deflated balloons and plastic bags can easily obstruct the airway and pose a significant hazard.
In terms of utmost security, devices like small parts testers that replicate the size of an infant's throat should be used to check if toys and other objects are safe to children less than three years old. Constant monitoring of the baby’s surroundings and immediate disposal of dangerous materials are crucial preventive actions.
Guidelines for Childproofing Your Home to Minimize Choking Hazards
To effectively reduce choking risks, a systematic approach to childproofing is paramount. Begin by inspecting the entire home for small objects that could pose a choking hazard. Items such as loose buttons, coins, marbles, detachable toy parts, or any object smaller than 1.25 inches (3.17 cm) in diameter should be removed or kept out of reach, following U.S. Consumer Product Safety Commission (CPSC) guidelines.
Food Safety Measures
- To reduce the risk of choking, cut all food into pieces no larger than 1/2 inch (1.27 cm) in size, especially for infants and toddlers.
- Avoid giving high-risk foods such as grapes, nuts, popcorn, hard candy, sticky marshmallows, and sausages unless they've been effectively modified (e.g., slicing sausages lengthwise or peeling grapes).
Toy and Object Safety
- Only purchase toys labeled as safe for children under three years of age, ensuring compliance with ASTM F963 toy safety standards.
- Use a small parts tester or create a DIY equivalent using a toilet paper roll. If an object can fit through, it is a choking hazard for young children.
Environmental Adjustments
- Remove or securely store deflated balloons, plastic bags, and packaging materials that could block airflow.
- Anchor furniture to prevent access to shelves where hazardous items may be stored.
- Ensure floors and tabletops are free of small, loose items during playtime or cleaning.
Implementing these technical safety measures and observing recommended parameters can help families create a safer environment for young children while significantly mitigating choking risks. Regular monitoring and adjustments are critical as children grow and develop new motor skills.
Safe Feeding Practices to Prevent Choking
I avoid serving foods that pose a choking hazard by ensuring that portions are appropriate for my child's age and size. Grapes, popcorn, and nuts are round, hard, and sticky foods that are avoided or sliced lengthwise. I am always within arm’s reach to supervise him, ensuring the child is seated while he eats. This helps him stay focused and reduces the likelihood of playing instead of eating. Sausages are served cut up, and meat is shredded. Furthermore, teaching how to chew and slowly introducing new foods properly also makes the process safer. Following these steps, I feel that the chances of choking during meals have decreased significantly.
When should you seek medical help for a choking infant?
If an infant cannot breathe, cry, or cough, immediate medical attention is necessary. An absence of these actions is a sign that the airway is obstructed, which is life-threatening. An infant appearing blue and limp, entirely unresponsive, is another dire situation where calling an ambulance is crucial. It's wise to seek medical assistance, even after choking is resolved, as there could be remaining airway damage. A professional will be able to assess the injury to the airway. Acting on time is vital alongside expert assessment for this situation.
Situations requiring immediate medical attention
Anything that requires ‘immediate medical attention’ frequently requires immediate medical assistance. Immediate symptoms that serve a threat to life include severe pain in the chest which may signify a heart attack, struggle with breathing, abrupt loss of consciousness, or extreme uncontrollable bleeding. As mentioned, other forms of emergencies consist of a sudden loss of vision with facial drooping, arm weakness, difficulty in speech, which indicates a stroke, and other types of broken bones, head injuries, or severe burns. In case I or anyone else experiences these symptoms, I would avail of prompt medical assistance such as an emergency medical service or visit the nearest emergency room.
Follow-Up Care After a Choking Incident
Following a choking incident, proper aftercare is critical to ensure the individual’s full recovery and to address any potential complications. Below are key steps and considerations:
- Observation for Lingering Symptoms
After the choking is resolved, monitor the individual for symptoms such as persistent coughing, wheezing, hoarseness, or difficulty swallowing, which could indicate an injury to the throat or airway or residual obstruction. Seek medical attention if these symptoms persist.
- Medical Evaluation
It is advisable to consult a healthcare provider, especially if the person experienced prolonged choking or loss of consciousness. Medical examinations, such as a laryngoscopy or bronchoscopy, may be conducted to assess any damage to the airway or esophagus.
- Assessment of Aspiration Risks
Choking incidents often involve the risk of aspiration, where food or an object enters the lungs instead of the stomach. Symptoms like shortness of breath, chest discomfort, or a wet cough may suggest aspiration, which could lead to pneumonia. A chest X-ray may be recommended to rule out any pulmonary complications.
- Understanding the Underlying Cause
If choking occurs due to a medical condition, such as dysphagia (difficulty swallowing), further diagnosis and specialist intervention may be required. A speech-language pathologist or gastroenterologist might employ diagnostic tools like a modified barium swallow study to evaluate swallowing mechanics.
- Prevention Measures and Education
Implementing preventive measures is essential for those at higher risk of recurrent choking, such as individuals with neurological disorders or the elderly. These may include modifying dietary textures, eating slowly, and avoiding high-risk foods. Training in first aid for caregivers and family members can also be beneficial.
- Parameters for Emergency Scenarios
If the patient experiences oxygen deprivation, assessing blood oxygen saturation levels (SpO2) is critical. Normal SpO2 ranges from 95% to 100%; levels below 90% may indicate hypoxemia and merit urgent medical intervention.
Timely and thorough follow-up care is instrumental in mitigating risks, preventing recurring incidents, and ensuring the individual returns to their baseline level of health.
References
- American Red Cross - Infant Choking: How To Help
- Mount Sinai - Choking: Infant Under 1 Year
- NHS - How to Stop a Child from Choking
Frequently Asked Questions (FAQ)
Q: What are the first steps to take when an infant under 1 year old is choking?
A: If an infant is choking, assess if they can cough or make sounds. If they can, encourage them to keep coughing. If the infant can't cough, cry, or breathe, immediately begin the choking rescue procedure. Start with five back blows followed by five chest thrusts. Always be prepared to act quickly and effectively in such situations.Q: How do I perform back blows on a choking infant?
A: To perform back blows, place the infant face-down along your forearm, supporting their head and neck with your hand. Use your thigh or lap for support. Give up to 5 quick, firm blows between the infant's shoulder blades using the heel of your free hand.Q: What are chest thrusts, and how do I perform them on infants?
A: Chest thrusts are performed if the five back blows don't dislodge the object. Place the infant face-up on your forearm, supporting their back. Place two fingers in the center of the infant's chest, just below the nipple line. Give five quick thrusts, pushing down about 1.5 inches.Q: When should I call 911 or seek help from a medical professional?
A: Call 911 immediately if the infant loses alertness, stops breathing, or if you can't remove the object after several cycles of back blows and chest thrusts. It's best to have someone else call 911 while you begin performing the life-saving steps.Q: What should I do if the infant becomes unconscious during choking?
A: If the infant becomes unconscious, start CPR immediately. Place the infant on a firm, flat surface and begin chest compressions and rescue breaths. Continue CPR until emergency services arrive or the object is dislodged, and the infant starts breathing normally.Q: Are the choking rescue techniques different for infants and toddlers?
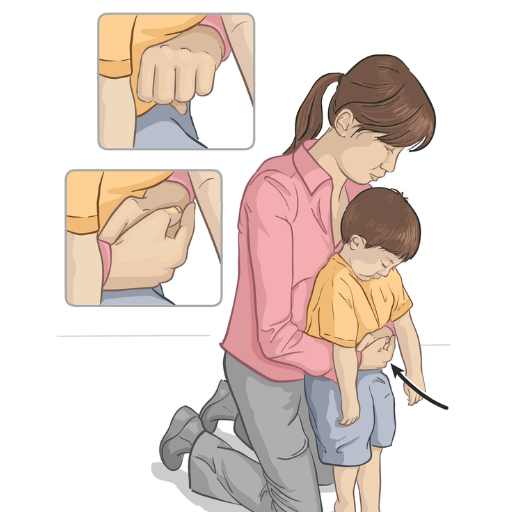
A: Yes, the techniques differ slightly. Use back blows and chest thrusts as described for infants under one year old. You can use abdominal thrusts (Heimlich maneuver) instead of chest thrusts for children over one year old. Always follow the most current guidelines from organizations like the American Red Cross or the American Heart Association.Q: What should I do after the choking episode if the infant seems fine?
A: Even if the infant seems fine after a choking episode, it's essential to have them checked by a medical professional. There could be unseen injuries or remaining small objects in the airway. Always err on the side of caution and seek medical attention.Q: How can I prevent choking in infants?
A: To prevent choking, always supervise infants during feeding and play. Cut food into small, manageable pieces. Keep small objects out of reach, as infants often explore by putting things in their mouths. Be aware of age-appropriate foods and toys, and always follow safety guidelines for infant care.


 Login with Google
 Login with Facebook