According to the statistics, choking is one of the leading causes, due to which infants under the age of one die. Such cases require much delicate attention and precise action, which can differentiate between life and death. This column aspires to come to their aid by offering practical assistance to a nurse and help by supporting the dissemination of primary clinical care. Although older kids, teens, and adults are all likely to choke, a person is most at risk when they are a child who is under the age of one. However, while it is easy to state that parents or any guardian should take necessary actions, understanding how to react in an emergency, what to do, and when to visit the doctor's office should all be comprehensively outlined to the reader. Such comprehensible instruction motivates parents to act with ferocity, knowing they have the means to do so.
How to Recognize When a Choking Infant Needs Help
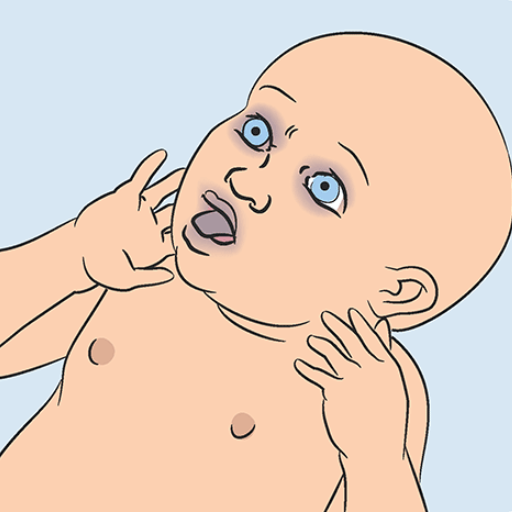
One must promptly recognize the signs and symptoms to assist the infant with choking. Breathing issues such as the inability to breathe in air, a meek or quiet cry, or even a cough that is not strong or nonexistent can be significant signs of infant choking. You might see the infant’s skin getting bluish (cyanosis ), meaning less oxygen supply to the infant’s body. When an infant has throat or airway discomfort, it may force them to panic, which is a sign to look out for. The infant may even wheeze or create high-pitched sounds if their airway is blocked to a certain extent. All of these suggest that a particular comment had been trying to convey. A quick understanding and grasping of these automatically reduce the chances of other issues arising and allow work to be done on the infant.
Signs and Symptoms of a Choking Baby
When a baby is choking, it is vital to recognize the signs immediately. The following symptoms are key indicators that an infant requires urgent assistance:
- Difficulty Breathing or Absence of Breathing
- The infant may exhibit labored breathing or stop breathing entirely. During breathing attempts, the infant may also show visible retractions of the chest or ribs.
- Silent or Weak Cry
- A choking baby often cannot produce a typical cry due to the obstruction in their airway. A weak, muffled, or utterly silent cry may indicate a severe blockage.
- Noisy Breathing or Stridor
- Partial airway blockage can result in wheezing, high-pitched sounds, or stridor (a harsh, grating sound) when the baby attempts to inhale.
- Coughing (Ineffective or Absent)
- If the airway is only partially obstructed, the baby might attempt to cough but fail to clear the blockage. An absence of coughing is particularly concerning as it indicates a complete obstruction.
- Skin Color Changes (Cyanosis)
- Bluish discoloration of the lips, face, or extremities is a critical sign of reduced oxygen levels in the blood. Paleness or flushing of the skin can also occur.
- Distress and Panic
- The baby might show signs of distress, such as widened eyes, thrashing motions, or excessive agitation. If able, it may clutch its throat instinctively.
- Loss of Consciousness
- Without intervention, prolonged choking can lead to oxygen deprivation, resulting in the infant becoming limp or unconscious.
Technical Parameters to Consider:
- Oxygen Saturation Levels
- Normal oxygen saturation for healthy infants ranges from 95% to 100%. Levels below 90% (measured if a pulse oximeter is available) indicate hypoxia and necessitate urgent intervention.
Right away, an age-appropriate first aid procedure must be performed, such as back blows and chest thrusts to help clear airway obstruction. However, if there is no return of breathing effort and the infant's deterioration, there is no wasting time in contacting Emergency Medical Services. Being able to identify these signs and respond immediately can aid in the rescue of a child’s life.
What to Do if the Baby Cannot Cough or Breathe
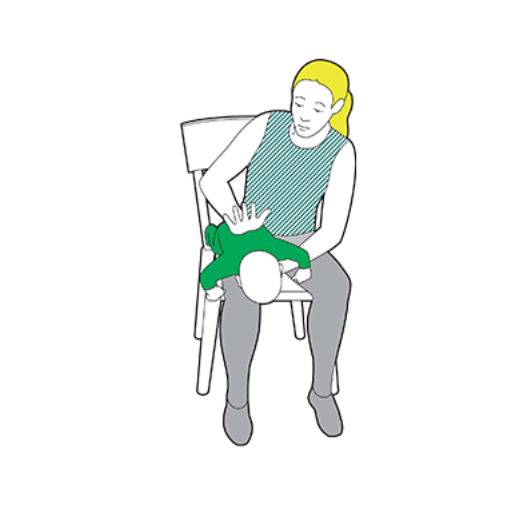
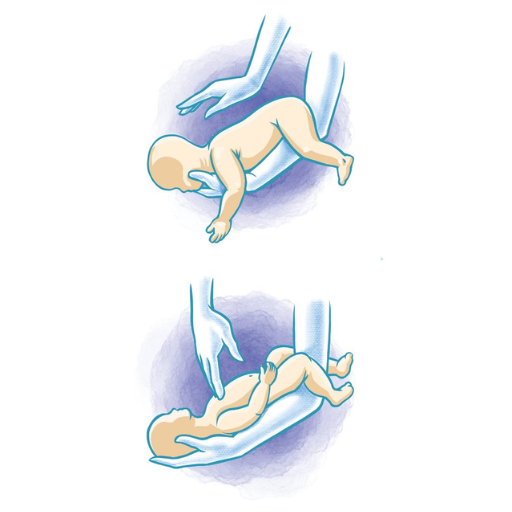
If your infant cannot cough or is struggling to breathe, take swift action to clear her airways. First, support the infant’s head and neck, grasp it in your palm, and place the infant's face on your forearm. Then, with the heel of your hand, deliver five firm strikes, which should be directed between the shoulder blades of the infant. In the case of an obstruction still being there, you have to turn the infant, place two fingers in the center of the chest just below the nipple line, and perform five chest thrusts. This combination of back blows and chest thrusts continues until the air passage is free or the child becomes unconscious. If the baby becomes unresponsive, administer the infant CPR, immediately calling for emergency assistance. Maintain your level of cool-headedness and set to action to render the required help quickly.
When to Call for Help if the Infant is Coughing Forcefully
Coughing indicates that an infant is struggling, and the blockage in their airway is only able to be removed through force. Encourage them to keep on coughing as this blockade must be removed, though keep an eye on the child to see that the blockage is not worsening.
Get emergency medical help performance when mild:
- The cough of the infant sounds weak or strained.
- An infant goes through respiratory distress, which includes but is not limited to having bluish skin, extreme discomfort while breathing, or losing consciousness.
- The stubbornness persists even after reasonable measures are taken, or the infant gasps for breath without letting out a sound.
Taking such preemptive measures ensures that professional medical assistance is only a phone call away when the situation gets dire for one reason or another. No one is above simple, basic medical help. Seek it when you feel things are going awry.
Immediate First Aid for a Choking Infant
If an infant is choking and you are confident that the airway is blocked (the child cannot cry, cough, or breathe), do the following immediately:
Position the Infant
Hold the baby’s head lower than the infant’s chest using your forearm and face the palm down onto your forearm.
Deliver Back Blows
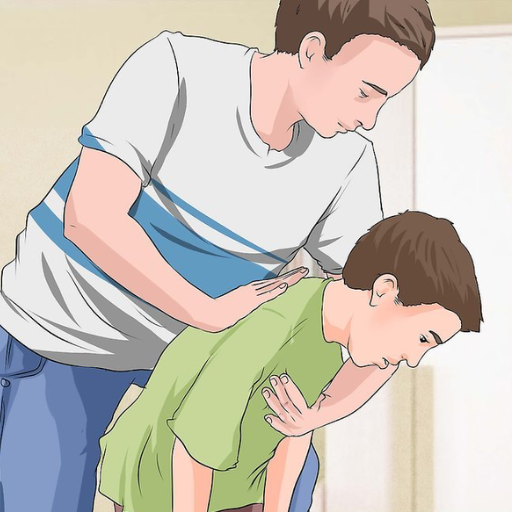
Ensure that the heel of your palm SOFTLY strikes the middle of the infant's back a few times, between the shoulders. And use the strength appropriate to their size. If they don't work, repeat them up to 5 times.
Perform Chest Thrusts
If back blows have not dislodged the object after the final retry, lay the infant on his/her back while keeping the head upright. Quickly and STRONGLY, grasp the infant at the shoulders or sides and perform chest thrusts. Apply a full grip and make TWO quick chest thrusts, one below the other at chest level. Do not combine with back blows.
Repeat as Necessary
Do this until the infant becomes unresponsive or breathing resumes: every time you perform thrusts or a back blow, do the other one straight after so it doesn’t lose its strength. (Do both infinity times)
If the Infant Becomes Unresponsive
As soon as the infant becomes unresponsive, commence Cardiac Pulmonary Resuscitation and clear the relevant body parts from the chest so immediate rescue breathing can occur. Continue performing CPR until the infant either fully recovers or until medical professionals can assist them.
If choking persists or the condition of the infant seems to be deteriorating or declining every minute, notify emergency medical services without fail.
Steps to Perform Back Blows and Chest Thrusts
There are several steps that you need to keep in mind so that you can perform back blows and chest thrusts properly.
Hold the Baby Safely
Seated or standing, I put the infant prone on my forearm. I ensure that the head is kept lower than the chest, which is a position that promotes the flow of air towards clearing the lungs.
Perform Back Blows
My other hand aims for the midpoint, and I strike firm but forceful blows between the baby’s joined shoulders and their upper-middle back until a total of five blows have been executed, all whilst adjusting my stance to ensure balance. Considering the infant's size, the blows are fundamental but controlled for the best results.
Back Thrusts
In the case that there is still an obstruction, I place the baby on their back, resting the baby on my forearms or knees while still supporting the head before inserting two fingers just below the nipple area and thrusting it five times. But this time, more caring and controlled.
Continue Alternating Until the Object is Gowen or Baby is Unresponsive
Until the object is removed or the baby stops responding, I will scan the infant’s mouth for slight uprisings, such as airways or saliva. These are critical for any promising signs during a CRP, a procedure aimed at restoring random attempts to do so.
Calling emergency services immediately is essential since a medical professional might be needed.
Proper Positioning: How to Lay the Baby on Your Forearm
The back-blowing and chest thrusting technique is one of the most delicate procedures to make or break the situation entirely. To avoid difficulties while performing these maneuvers, you need to place the infant according to the following instructions properly:
Back Blows (ak A–Pressure) Technique
- To prevent any form of instability, sit or kneel sturdily.
- This is done so that they do not get choked. Cupping the head and jaw without blocking the throat, place the infant’s chest along the forearm, thus compressing the stomach.
- While holding the infant further supine, tilt it back while ensuring the forearm rests across the thigh.
Chest Pressure Technique
- Ensure to initiate this step after placing the infant on its back.
- While lying or holding the baby in a supportive position, lower the baby’s head slightly below the upper body to avoid injury.
- The fingers need to be pointed toward the chest area just below the nipple and relayed to the ribs with a distance of not more than four centimeters. The depth of the thrust should be one and a half inches, approximately 4 centimeters.
To keep gravity constant, the baby’s head must remain below its chest while performing the back blow and chest thrusting techniques.
As you cradle the infant’s head and neck, support it firmly to avoid injury and ensure the airway remains clear.
Excessive force should not be applied during back blows and chest thrusts as this could cause further injury, but the force applied still needs to be effective.
Such measures should be done carefully and monitored closely in the infant’s case. Suppose the obstruction has not been cleared due to attempts when the baby becomes unresponsive. In that case, it is essential to immediately last on CPR and check if emergency services have been notified.
Ensuring Safety: Supporting the Infant's Chest and Shoulder Blades
To protect the baby’s health during these movements, the torso is held in the forearm, and the head and neck are in the other hand. This way, the infant's body is restrained, and the therapist can perform enough back blows or chest thrusts. I support the infant’s determination to grab by molding the spacing in which the chest and the bearers are placed, preventing them from misplacing themselves and hurting the infant. Moreover, I would point out that even all their heads must be left hovering if needed.
Technical Parameters to Consider:
- This maneuver requires restraint of the baby’s chest and torso, with the forearm supporting the center of gravity.
- Cupping the infant’s jaws or cheekbones without causing undue pressure on them is a way to maintain an appropriate head and neck position.
- To deliver sufficient back blows, there is no space between the blades of the shoulder and the abdomen.
- It is crucial to apply a moderate amount of force to avoid stressing the baby's spine or thoracic cavity.
This insertion of intervention mechanics into the infant's back during the delivery of the interventional treatment achieves effectiveness and safety throughout the intervention.
Preventing Choking Hazards in Babies

When playing and feeding infants, exercise special care to lower the risk of choking. Below, find a few concise preventative measures:
- Supervision of Eating: It is crucial to supervise children during mealtime. Ensure that they are in an upright position and not lying down or standing.
- Appropriate Food Preparation: Solid foods should be cut into pieces that are easy to chew, and complex objects like grapes, nuts, or raw vegetables should not be given.
- Select Safe Toys: Dispose of any toys that are deemed risky for choking, and substitute age-suitable toys without detachable parts.
- Prohibiting Hazardous Objects: Disallow infants access to coins, buttons, and other household items, and frequently scan the surroundings for potential threats.
- Educate the Caregivers: Giver the proper instructions to whoever has to care for the baby, ensuring they fully understand the risks associated with choking on food.
Multiple investigations indicate that taking these precautions lets parents be confident that their children will not choke while playing or feeding.
Common Small Objects That Pose Risks
In identifying objects that present risks to infants and toddlers to reduce swallowing accidents, it is critical to highlight those objects in detail. The following is a comprehensive description of the various parameters associated with potentially dangerous objects:
- Coins: Due to their dimensions ranging from 0.75 to 1.25 inches in diameter, which is the size of a quarter, and their widespread availability in many households, coins threaten children with choking.
- Balloons: Latex or rubber balloons can be dangerous, as infants can swallow them and suffocate.
- Buttons are relatively safe, as children mostly do not swallow them. However, significant adults in the household often wear clothes with buttons, which makes younger children prone to access them. Buttons are common on clothing or household products and are small, measuring less than 0.5 inches or 12 m, thus increasing their chances of being detached.
- Marbles and Small Balls: Circular or spherical objects taller than 1.75 inches or 45 mm can break their necks, and those made of glass or molds may also be targets.
- Batteries: Any button battery measuring less than 1 or 25 mm long is a choking hazard and can cause chemical burns.
- Toys and Game Pieces: All other small components in toys and game parts that have been classified by the CPSC as ‘small parts’ that are 31.7 mm in size or more prolonged than 1.25 inches should be avoided by children.
- Jewelry: If a small piece such as a ring, bead, or earring is detached, it can be swallowed, posing a risk that can lead to suffocation.
- Food Items: Hard candies, whole grapes, nuts, and popcorn can choke a person if ingested carelessly.
Caregivers are advised to often examine their surroundings for these typical risks and follow the safety guidelines to minimize potential dangers.
Tips on Baby-Proofing Your Home to Prevent Choking
1. Use a Choke Tube or Small Parts Tester
A small cylindrical device known as a choke tube with an interior diameter of 1.25 inches (31.7 mm) can allow you to test for any choking hazard. Any item that could fit entirely within this cylinder is small enough and should be out of reach of children.
2. Hazardous Materials Safe Storage
Keep small things like coins, marbles, beads, or button batteries in drawers or cabinets that lock. Ensure the storage places are high up where children cannot reach or have childproof fasteners.
3. Inspection and maintenance of toys regularly
Inspect toys for missing parts or other damage. Comply with the CPSC (Consumer Product Safety Commission) rules and ensure adequate age restrictions for toy usage are followed. Don't provide toys with small detachable parts to children younger than 3.
4. Food Safety Practices are a must-follow
Foods can be modified so they do not pose a risk of choking. For example, grapes, hotdogs, or cherries can be cut into pieces no more significant than quarters. Children younger than 4 years old should not be given hard candies, full nuts, or popcorn. Every time eating is done, a supervising adult should be present.
5.Use Safety Gates and Play AreasUsing movable features as a choke-point is not advisable, so children should also be positioned in play areas that do not contain small objects that may lead to choking, enclosing such parts of the walls with safety gates.
6.Practice Household MaintenanceLoose objects that older children or other visitors may or may not drop can be quite a problem in homes, so it is generally best to vacuum clean the floors, furniture, and hard-to-reach areas regularly.
7.Educate Everyone in the HouseholdFamily members, babysitters, household members, or visitors should be informed of such risk or potential as a choke-one. Soon, it is of great essence that safety prevents the children from acquiring small objects, jewelry, or even special types of food.
For young children, if the caregivers use the baby-proofing processes effectively, choking hazards, specifically general hazards, may be decreased to a great extent.
Educating Caregivers on Choking First Aid Procedures
A caregiver can respond effectively if a child is choking in several ways. First, I would assess if the child can cough or breathe. In the case of a partial airway obstruction where some airflow is still available, coughing can be encouraged. On the other hand, if the airway has been fully obstructed and there is an absolute lack of airflow, I would administer five back thrusts (between the shoulder blades with the heel of my palm) followed by five abdominal thrusts (for children above one year) precisely in that order. For children under one year of age, I would recommend a series of back and chest thrusts, which is a technique that is much more useful than abdominal thrusts. I would continue this cycle until the object blocking the child’s throat is removed or the child becomes unresponsive. In case the child does become unresponsive, I would position the child flat as well as begin CPR while waiting for help. The average response time for professionals can be around three minutes, the average time a child can go without oxygen. Hence, having such knowledge is vital and can be the difference between life and death.
What to Do When a Baby is Choking and Becomes Unresponsive
When a choking baby becomes unresponsive, it is critical to begin CPR immediately while ensuring emergency services are contacted without delay. Follow these steps systematically:
Steps for Performing CPR on Infants
- Check Responsiveness and Call for Help
First, I would gently tap the baby’s foot and call their name to check for responsiveness. If there is no response, I would immediately shout for help and ensure someone contacts emergency services while I begin CPR.
- Open the Airway
I would place the baby on a firm, flat surface and gently tilt its head back by lifting the chin to open the airway. However, I would ensure that it does not tilt too far, as this could further block the airway.
- Provide Rescue Breaths
After confirming the airway is open, I would seal my mouth over the baby’s nose and mouth, deliver a gentle puff of air, and watch for chest rise. I would give two rescue breaths, pausing briefly to ensure adequate ventilation.
- Perform Chest Compressions
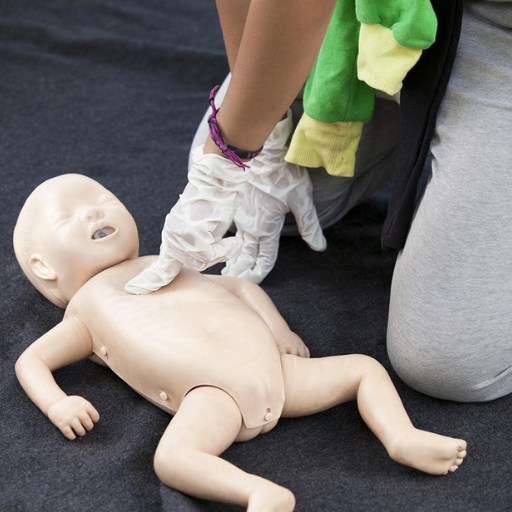
Using two fingers placed in the center of the baby’s chest just below the nipple line, I would deliver 30 gentle chest compressions at a depth of about 1.5 inches. The compressions would be quick and rhythmic, at a rate of 100–120 per minute.
- Repeat the Cycle
I would continue alternating between two rescue breaths and 30 chest compressions until the object is dislodged, the baby starts to breathe again, or professional help arrives.
- Monitor for Changes
Throughout the procedure, I would carefully watch for any signs of object removal or the baby regaining responsiveness and act accordingly.
When to Stop and Wait Until Help Arrives
It is essential to know when to stop performing CPR and allow professional assistance to take over. If the following occurs, it is better to stop performing the procedure altogether.
The Baby Recovers Spontaneous Breathing and Responsiveness.
In the unfortunate event where an infant has to be given CPR if the infant begins to cough, cry, or breathe a regular course, then CPR should be stopped. Roll the child over onto his or her side to put them into recovery and ensure the airway remains unobstructed. Also, you must ensure the child continues to breathe.
Professional Assistance Arrives.
Enable trained medical assistance where CPR is imparted to the child around by me when the emergency responders reach the scene.
You are Physically Unable to Continue.
Stopping the CPR is the best option if exhaustion takes over and appropriate strategy fails to be executed as continuing needlessly then runs the risk of severe injury to the person being aided as the technique fails to work.
A Defibrillator Becomes Available.
Upon the arrival of the AED, the machine should follow the procedures laid down. But bear in mind that life vest pumps. This aid is not usually suited for infants younger than one year of age unless there are some pads or the ability to target babies.
Effective CPR for infants that is to be aimed at babies would be as follows:- Compression Depth: One-third of the chest-deep, which amounts to about one and a half inches
- Compression Rate: It should range from 100-120 throughout the course.
- Administering breaths: Provide two breaths with a one-second pause in between each, which should be visible through the rise of the chest.
Be cautious when providing CPR as every particular action is considered as a single blow, thus making the whole performance more compelling to a greater extent. Always watch the infant from one point to another to determine the path of action.
How to Position Your Two Fingers for Chest Compressions
To get your two fingers into the correct position during infant CPR, place them on the sternum, just beneath the nipple line. Ensure that you use the pads of your index and middle fingers to compress the pressure to have a defined focus. Do not assume force on the rib cage or the xiphoid process since that can cause damage. The relevant specifications should be observed while performing manual chest compressions.
- Compression Point: The mid-sternum is approximately 1 cm below the nipple line.
- Compression Depth: About 4cm or one-third the depth of the chest.
- Hand Positioning: Functional pads of index finger and middle finger.
- Compression Rate: Do between 100–120 compressions in a minute.
Remember that following each compression, the chest should be allowed to recoil, facilitating blood circulation. Suppose more blood is being provided to the periphery. In that case, more blood can be extracted, meaning that a detailed technique has been permanently assumed, which requires minimizing the chances of injury.
Understanding the Role of CPR and When to Use It
Cardiopulmonary Resuscitation (CPR) is a practical skill aimed at preserving blood flow to heart and brain tissues until advanced medical care can be provided during cardiac arrest or when a victim cannot breathe correctly. It’s important to point out that the effectiveness of resuscitation measures dramatically depends on the type and duration of the cardiac event; however, it is always easier to prevent cardiac arrest than to treat it effectively. This biotechnological intervention is a vital part of care in drowning episodes, choking, unexplained loss of consciousness, massive cardiovascular injury, or any condition that can induce a state of coma. Timing is critical, the best performance is noted when CPR is done at the sight of the first instruction of “Call for help” which is immediately after symptoms of cardiac arrest such as loss of responsiveness or normal breathing.
When an Infant is Choking and Becomes Unconscious
For infants who lose consciousness, the first step once the environment is deemed safe for the intervention, which usually takes place during the onset of choking, is to place the baby on a firm surface and call for help. During this time, I also believe in putting effort into performing CPR. When I begin CPR, the sequence follows: 30 chest compressions commencing with two fingers slightly below the nipple area in the middle of the chest front. Next, after performing the compressions, I examine the mouth of the infant. If I can see anything blocking the airway, I am willing to remove it, but only after ensuring that I can do so without any risk. I will also not stick my fingers inside the mouth blindly. After that, I breathe into the mouth of the baby to rescue him/her. I ensure that I provide two such breaths, both enabling the chest cavity to expand. The patterned repetition of performing 30 compressions followed by 2 breaths is maintained till assistance comes or the baby regains consciousness completely. In this case, however, a more positive outcome is the baby starting to breathe independently, which also stops the pattern.
The Importance of Chest Compressions and Airway Management
The techniques of chest compressions and airway management are instrumental in the effort to resuscitate a person, especially when the person is choking and at unconsciousness level. Simply put, heart compressions simulate heart activity, helping pump blood across the human body and preventing brain and heart damage caused by lack of oxygen. As per specification, it’s noted that for infants, the average area between the navel and the breast must be compressed to a depth of roughly 1.5 inches (4 cm). This compression should be at 100 – 120 compressions per minute. To carry out hand operation correctly a person should use two fingers correctly positioned just below the nipple line to avoid excessive bone crushing.
Another important part is opening and securing the airway passage because, without a strong airway force, oxygen will not be able to reach the lungs. After performing compressions, the first thing that should be done is re-opening the airway using head tilt and chin lift before an attempt is made to start on the rescue breaths. One single breath should take 1 second to inhale without overdoing it as that would inflate the stomach or lead to other undesirable effects while at the same time allowing the chest to rise and expand visibly effortlessly.
Integrating effective chest compressions with airway management increases the likelihood of surviving and recovering from an emergency. These maneuvers ensure that oxygenated blood reaches the body and simultaneously correct the cause of airway obstruction, as advised by the American Heart Association (AHA) and other organizations. However, these techniques are performed consistently and adequately only when guidelines are followed and the infant’s response is monitored.
Follow-Up Care After a Choking Incident
Monitoring for any persisting signs of coughing, trouble swallowing, or breathing contains an air of importance after any choking situation as they can hint towards the concerns of aspiration pneumonia or an airway injury. Through caution, it is best to book a medical check immediately, especially if the person is unconscious or has to receive aggressive measures such as abdominal thrusts. I would also suggest that a physician examine the patient thoroughly during the visit to add more certainty; the doctor might seek permission for more invasive methods and order chest X-rays or laryngoscopy to evaluate signs of obstructions or damages left untreated in the individual. To assist in recovery, keeping oneself hydrated and steering clear of any solid food until medically advised can also be helpful.
References
Choking Cardiopulmonary resuscitation ThoraxFrequently Asked Questions (FAQ)
Q: What are the first steps if the infant is choking?
A: If a baby from choking shows signs of distress, quickly determine if they can cry or cough. If they cannot, immediately call for emergency help and start first aid.Q: How do I position the infant to perform first aid?
A: Turn the baby face down along your forearm, supporting the infant's chest in your hand and their head with your fingers. Ensure the infant's shoulder blades are securely supported.Q: How do I perform back blows on a choking infant?
A: Use the heel of your hand to give up to 5 back blows between the infant's shoulder blades. These should be firm and aimed at dislodging the object.Q: What should I do if back blows do not dislodge the object?
A: If the object is not dislodged, turn the baby face up while supporting their head and neck, and prepare for chest thrusts.Q: How are chest thrusts performed on a choking infant?
A: With the baby face up, place two fingers on the infant's chest along the nipple line. Give 5 quick chest thrusts, pressing down about 1.5 inches to push the object out.Q: What should I do if I see the object causing the blockage?
A: If you can see the object in the infant's mouth, try to remove it with a finger swipe. Do not blindly sweep your finger, as this can push the object further down the throat.Q: How do I know if the baby starts breathing normally again?
A: A strong cry or the return of standard breathing patterns indicates the airway is clear. Continuously monitor the baby's breathing.Q: What should I do if the baby becomes unconscious?
A: If the baby becomes unconscious, call emergency services immediately if not already done, and begin infant CPR until help arrives.Q: Where can I find reliable information on infant choking first aid?
A: Resources like the MedlinePlus Medical Encyclopedia or a gov website belong to trusted sources for first aid guidelines.


 Login with Google
 Login with Facebook