


Choking can become a life-threatening situation, which means that it needs to be dealt with right away. In this article, I have attempted to prepare your mind for choking emergencies using the Heimlich maneuver and additional first aid procedures. Readers will thoroughly learn how to identify the symptoms and signs of choking, evaluate the severity of the blockage, and implement appropriate measures about the victim's age and status. This guide also provides precise steps for dealing with adults, children, and infants and, in all cases, promises swift and practical help, which guarantees that individuals are able and willing to act in emergencies.
What are the signs that someone is choking?
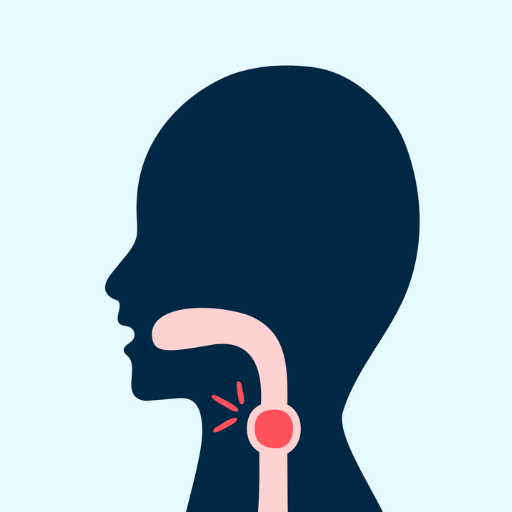
Choking happens when something blocks the airway and makes breathing difficult. Some recognizable signs are shortness of breath, constricted speech, wheezing, or cardiac arrest. The person in distress may hold his or her throat because this action is universally acceptable to indicate trouble. Other signs will be skin changes in color, such as the face and lips, which may appear blue due to oxygen deficiency and an anxious look. Severe cases of choking can also lead to passing out if an individual is unable to remove the problem for an extended time. Recognizing these signs is very important as it helps the distressed individual to receive the proper care at the right time.
Recognizing the universal sign of choking
Recognizing the universal sign of choking is only the first step; immediate intervention is required to prevent serious complications. If someone is choking and unable to speak or breathe, these are the standard steps to follow:
- Verify the Severity
- If the airway is partially blocked, the individual may still be coughing. Encourage them to keep coughing forcefully, as this can expel the object naturally.
- Action must be taken immediately for a completely blocked airway (no sound, no coughing).
- Abdominal Thrusts (Heimlich Maneuver)
- Position yourself behind the individual.
- Place a clenched fist just above their navel and grasp it with your other hand.
- Deliver quick, upward thrusts to apply pressure to the diaphragm. The objective is to create an artificial cough to dislodge the obstruction.
- Chest Thrusts (for Special Cases)
- If the individual is pregnant or obese, chest thrusts are recommended instead. Position your hands at the center of your chest and push sharply inward.
- Back Blows (Alternate Method)
- If abdominal or chest thrusts fail, deliver up to five firm back blows between the shoulder blades using the heel of your hand. Alternate between methods if necessary.
- Perform CPR (if Unconscious)
- If the individual loses consciousness, immediately lay them on their back, ensure their airway is open, and begin CPR. Provide chest compressions at a rate of 100–120 compressions per minute at a depth of 2–2.4 inches for adults.
These technical interventions should be conducted urgently and precisely. If the obstruction persists despite these measures, seek emergency medical assistance without delay, as prolonged oxygen deprivation causes irreversible damage.
Distinguishing between partial and complete airway blockage
Let's consider the understanding of partially blocked and wholly blocked airways. No signs of either obstructed or complete loss of airway are critical. Partial blockage, for instance, is medication rigorous to treat. This is easily deciphered from the ability to breathe, albeit with some wheezing and cough formation. On the contrary, complete blockage is way more serious as it does not allow the human body to perform basic activities like talking, breathing, or even coughing. Those ineffective actions can result in him/her grabbing their windpipe in a desperate state accompanied by erratic body movement or even passing out if rested unattended. Defining all is separation is vital for employing the right life-saving actions.
When to intervene in a choking situation
I would step in to help out the moment it becomes clear that the person is severely choking. This includes the inability to speak, cough, breathe, look distressed, clutching the throat, or skin turning blue (cyanosis). If the person is still conscious and cannot remove the obstruction, I would apply pressure on the stomach (or perform the Heimlich maneuver) to force it out. In the case of someone unconscious, I would start CPR and check the airway after every 30 compressions, removing any obstruction if it is visible. Technical parameters include ensuring the abdominal thrusts remain directed upwards and inwards, and compressions during CPR are maintained at a depth of around 5cm and a rate of 100–120 BPM, following emergency protocols.
How do you perform the Heimlich maneuver on an adult?
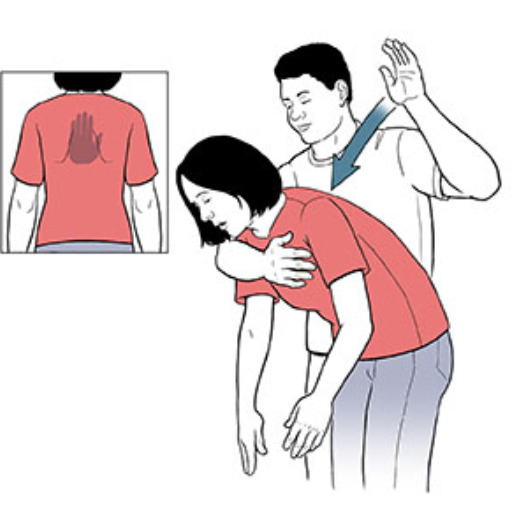
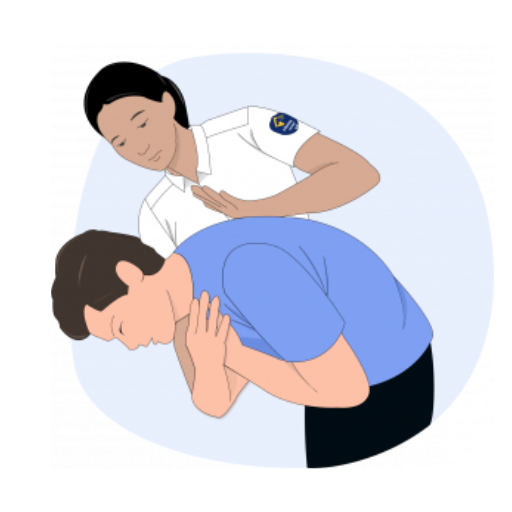
To perform the Heimlich Maneuver on a fully grown person, one must be positioned right behind them. Wrap your arms around them while standing behind them. Using one of your hands, form a fist and place the thumb side of the fist about two inches above the navel and below the rib cage. Grab the fist with your other hand and thrust the abdomen upwards very fast. Keep doing swift thrusts until the foreign body within the airway is removed or until the person faints. Remember that the Heimlich maneuver can cause injury if not performed cautiously.
Step-by-step guide to performing abdominal thrusts
- Make Sure to check for signs of choking. Confirm that the person cannot cough, talk, or breathe. To confirm this, ask them, “Are you choking,” to see if action needs to be taken.
- Position Yourself: Move behind the person and wrap your arms around their waist. Ensure you are securely positioned. Ensure you are in a secure stance that allows you to thrust quickly.
- Prepare Your Hands: Form a fist with one hand and place the thumb side of your fist three to four inches above the navel, below the ribcage. Avoid Applying any kind of pressure or force against the bottom side of the ribcage.
- Applying abdominal thrusts: If a person is choking, put your fists together and rapidly swing into their abdomen while pulling them towards you. Constantly increase the power until the obstruction is dislocated, but remember to be careful so that no damage is incurred.
- Continue performing until a proper result is achieved: Continue performing abdominal thrusts until the obstructing object is expelled. Also, you might have to do the same if an individual goes unconscious. If the individual goes unconscious, treat the casualty using CPR as the first step while ensuring that the emergency services are called in.
Always ensure precision and control hit and force application depending on the condition while adhering to first aid procedures.
Proper Hand Placement and Body Positioning
The correct technique and posture assumed while performing abdominal thrusts ensure high efficacy and safety of the skill. To begin with, stand directly behind the person who is choking and provide a firm base of support by standing in a stable position. Your fist should be with the thumb side on the area of the navel and below the xiphoid process of the sternum. This placement avoids putting pressure on the rib cage, which may lead to fractures or other internal injuries.
While holding them from the waist, your elbows should be brought out to the side at an angle less than ninety degrees to make applying force and controlling it easier. Your arms should be low and firm around the abdomen and body of the individual to ensure that you maintain a firm grip. The 'J' should throat the thrust. The thrust should commence with the arms sitting firmly in the abdomen of the target area; the arms will move at great speed in the shape of a J. The thrust per se should be used so the obstruction is pressured away. Studies suggest that in the average person (adjusting for size and age), a force range of 6-10 kg (13-22 lbs) is optimal.
Stay balanced by keeping your feet apart at shoulder level, increasing stability, and minimizing the chances of losing balance while performing the procedure. When doing chest thrusts for obese persons or pregnant females, place your hands below the sternum instead to alleviate pressure on the abdomen. Your attention to detail about the method and positioning will increase the success and decrease the chances of sustaining compounded injuries. You must always apply the first aid rules irrespective of the patient’s condition.
How many thrusts to perform before reassessing
Before reviewing the procedure results, I conduct five abdominal or chest thrusts. Having completed five thrusts, I attempted to verify whether the obstruction was removed and whether the patient could breathe. If they are not, I shall continue to perform five chest or abdominal thrusts in the process of reassessing. If hen the subject shows no response, I will perform CPR. This method is known to be used in first-aid attempts for unresponsive patients.
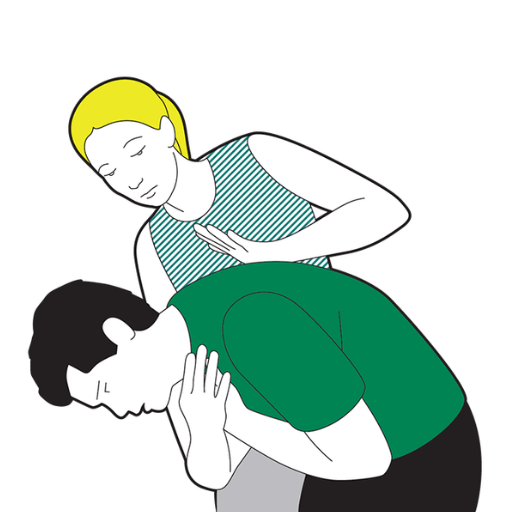
What is the correct technique for back blows in choking first aid?
The first countermeasure in aid procedures involving obstruction of anything into the airway (choking) is back blown, which needs to be done with the operator positioned to the side and rear of the patient. While supporting the patient’s chest with one hand, lean him forward, and after ensuring the patient’s waist is forward, angle the airway vertically. With the heel of the opposite hand, hit firmly between the shoulder blades. Deliver up to five back blows, each attempt at dislodging the obstruction needing to be forceful and targeted but proficient in monitoring to make each hit effective. If the object remains lodged after a few stern thrusts, it is plausible to switch to abdominal or chest thrusts.
Positioning the choking person for back blows.
To properly position the choking person for back blows, follow these steps:
- Body Positioning:
- Stand slightly to the side and behind the choking individual to maintain effective control and leverage.
- Ensure the person leans forward at the waist so the head and upper body are angled downward. This positioning utilizes gravity to aid in expelling the obstruction.
- Chest Support:
- Use one hand to firmly support the individual's chest to prevent them from falling forward while ensuring stability during the procedure.
- Strike Delivery:
- Ensure the airway is positioned downward before administering the back blows to optimize the chance of clearing the obstruction.
These steps ensure safety and efficacy; meeting recognized first aid standards for choking emergencies. Continually reassess and adapt based on the individual’s condition.
Correct hand placement between the shoulder blades
I ensure my hand positioning is accurate and efficient when giving back blows in a choking situation. I strike with the heel of my dominant hand towards the person's upper back, specifically the central area between the shoulders. This hand part is intended to render a powerful and focused impact of sufficient strength to remove the obstruction. It is best to perform the blow swiftly without using excessive force that may cause injury while ensuring the individual is supported and in the correct forward-leaning position. Whichever way you choose to assist, the aid given first is the proper way to manage the case.
Alternating between back blows and abdominal thrusts
As I switch between the back blows and abdominal thrusts, I do these steps in a sequence to ensure maximum efficiency with both techniques. First, I perform five back strikes, focusing on the area between the shoulder blades and using the palm of my dominant hand. If I reach the point where the object is not dislodged, I quickly move towards five abdominal thrusts. (Heimlich) With the victim standing in front of me, I will position myself behind them, and then placing my fist above their navel; I grab my fist with the other hand. Next, I perform quick thrusts upward to create enough pressure to clear their airway. Repeating the process of five back blows and five thrusts continues until help arrives or a bystander provides aid. Writing for less proficient readers and changing strategies in real-time is essential. These steps follow the recommendations given by leading first aid providers: accuracy, rapidity, and safety.
How to Save someone from choking or an infant?
Saving an infant from choking is a bit tricky because of their anatomy. First, position the infant face down on your forearm so the forehead is lower than the torso, and your hand supports the head. Use the heel to hit vigorously five times the center of the back in between the shoulders with your non-dominant hand. If the object is still stuck, flip the infant over and use two fingers to gently compress the center of the chest, right below the nipple line, instead of dilating the abdomen. Every round of compressions should be gentler than the one before to avoid damage to the chest drives. Repeat this cycle of five chest compressions and five back blows until the obstruction is removed or help arrives. Within all this, ensure to interpret how the infant is reacting to avoid harm.
Modifying the Heimlich Maneuver for Children
When performing the Heimlich maneuver on children, modifications must be made to accommodate their smaller size and developing anatomy. For children aged 1 to 8 years, the procedure is similar to that for adults but requires adjusted force to prevent injury. Follow these steps:
- Assess the Situation: Ensure the child is choking (e.g., unable to cough, speak, or breathe).
- Positioning: Kneel or position yourself at the child’s height for better control.
- Abdominal Thrusts: Place your fist slightly above the navel and below the ribcage, ensuring not to compress the lower ribs or sternum.
- Force Application: Grasp your fist with your other hand and apply quick upward thrusts, using moderate force suitable for the child’s size and physical condition.
- Repetition: Continue performing abdominal thrusts until the object is expelled or the child becomes unresponsive.
Technical Parameters to Consider:
- Thrust force should be sufficient to generate upward pressure in the diaphragm while avoiding excessive force that could lead to internal injury.
- Hands must be placed accurately to prevent compressing the xiphoid process (lower sternum), as this could cause fractures or tissue damage.
If the child loses consciousness, immediately call for emergency assistance and begin CPR while following standard guidelines for pediatric resuscitation. Always observe the child’s reaction closely to ensure the maneuver is performed safely and effectively.
Performing Chest Thrusts on Infants
Before doing chest thrusts on an infant, I would place the baby on their back on a flat surface. Then, put my two fingers on the mid-region of the infant's chest, just below the nipple line, and thrust downwards. The thrust would be just under 4cm, and I would bring my fingers back to the starting position between each thrust. Each thrust should be around 1.5 inches deep and should be firm but gentle. I would perform five thrusts in total and subsequently bring the infant back into a resting position. Given how delicate infants are, it is crucial not to apply too much force. If the object blocking the airway is not removed, I will switch from the chest thrusts to back slaps, keeping my attention on the baby and notifying emergency medical assistance.
When to Switch from Back Blows to Chest Thrusts for Infants
Switch to chest thrusts if back blows don’t remove the obstruction in the infant’s airway. Do five stiff back blows in the area right above the infant’s shoulder blades using the heel of your palm? Move to chest thrusts if there is no sign of coughing, crying, or spitting. Throughout the process, watch the baby to see if the procedures effectively relieve the obstruction without risking further injury. If the baby becomes unresponsive or there are repeated cycles of obstruction despite employing both methods, start CPR immediately and use emergency medical services.
What Should You Do If the Choking Person Becomes Unconscious?

If the person choking is unresponsive, lay them flat on a hard surface and call for emergency medical services if it wasn’t done already. Start CPR with chest compressions. Move on to rescue breaths, but check for any blockage in the airway first, as manual removal may cause harm. Until the emergency responders arrive or the patient starts breathing, perform 30 chest compressions followed by two rescue breaths. Keep your movements controlled and make the restoration of airflow the priority.
Transitioning from Heimlich Maneuver to CPR
If I were helping someone who was choking, I would first try the Heimlich maneuver to help them. But, if the person choked to the point of unconsciousness, I would then start the process of CPR immediately. First, I would ensure the person is lying flat on their back. If someone hasn't already called for an ambulance, I would do that as I begin chest compressions. My rescue breathing protocol consists of chest compressions at a 30:2 ratio of fourteen breaths. Before I attempt to take a breath, I will check the mouth for any discernable objects that may pose a threat as I remove them. I would keep performing these tasks until the person performed spontaneous respirations or until the paramedics arrived at the scene.
Performing Chest Compressions and Rescue Breaths
To begin chest compression, place one hand in the center of the victim's chest below the chin. Use the other hand to lift the chin and pat the person on the shoulder. Ensure that the elbows are not bent during this procedure. The ideal chest inflation and deflation ratio is 5:1. Remember to restore your hand position when not in motion. The compression speed should be 100-120 per minute, and the optimal depth for elderly patients is roughly two inches.
When giving rescue breaths, gently tilt the head of the individual while pinching their nose with one hand to seal it, and place your lips on theirs. Subsequently, cover their mouth and give them the aforementioned single breath while ensuring their chest rises. If done correctly, the chest will recoil after some time has passed, around three seconds. You must immediately repeat the previous steps in a cycle - for every thirty chest compressions, give them two rescue breaths. You may stop this action once the person regains awareness; otherwise, turn to the local services for help. It is essential to perform these directions instantly in case of someone collapsing from cardiac arrest or having a respiratory problem.
Checking for and removing visible obstructions
I first conduct a visual inspection of the region or equipment in question to identify obvious potential obstacles. I seek any physical barriers, debris, or blockages that may obstruct proper functioning or sight. After the challenges are determined, I systematically employ suitable methods and tools to remove them, restoring the system or workspace to the desired state.
References
- MedlinePlus: Heimlich maneuver on self - A trusted resource for medical information.
- StatPearls: Abdominal Thrust Maneuver - A detailed explanation of the Heimlich maneuver and its applications.
- HealthFinder: Abdominal Thrusts - A health encyclopedia entry on performing abdominal thrusts.
Frequently Asked Questions (FAQ)
Q: How do I recognize someone who is choking?
A: Signs of choking include inability to speak, difficulty breathing, clutching the throat, coughing weakly, and skin turning blue. If you suspect someone is choking, it's crucial to act quickly and provide first aid for choking.Q: What is the first step to help someone who is choking?
A: The first step is to ask the person if they're choking. If they can speak, cough, or breathe, encourage them to keep coughing. If they can't talk or breathe, proceed with first aid techniques such as back blows and abdominal thrusts, also known as the Heimlich maneuver.Q: How do I perform the Heimlich maneuver on an adult or child?
A: To perform the Heimlich maneuver, stand behind the person and wrap your arms around their waist. Place a fist with one hand above the person's navel. Grasp your fist with your other hand and perform five abdominal thrusts by pulling sharply inwards and upwards. Repeat until the object is dislodged or the person becomes unresponsive.Q: What should I do if the Heimlich maneuver doesn't work?
A: If the Heimlich maneuver doesn't work, alternate between five back blows and five abdominal thrusts. Continue this cycle until the object is dislodged, the person can breathe, or the person becomes unconscious. If the person becomes unconscious, start CPR and call for emergency help immediately.Q: How do I perform first aid for choking on an unconscious adult?
A: Call for emergency help immediately for an unconscious adult. Begin CPR, starting with 30 chest compressions. Before giving rescue breaths, check the mouth for visible obstructions and remove them if possible. Continue CPR until help arrives or the person starts breathing.Q: What is the proper technique for performing back blows?
A: To perform back blows, stand to the side and slightly behind the choking victim. Support their chest with one hand and lean them forward. Use the heel of your other hand to deliver five sharp blows between the shoulder blades. The goal is to create enough force to dislodge the object from the windpipe.Q: When should I seek medical help for a choking incident?
A: Always seek medical help after a serious choking incident, even if the object has been successfully removed. Call for emergency help immediately if the person loses consciousness, has difficulty breathing after the object is removed, or if you cannot remove the object. It's essential to have a medical professional evaluate the person to ensure there are no complications.Q: How can I prevent choking in everyday life?
A: To prevent choking, cut food into small pieces, chew thoroughly, and avoid talking or laughing while eating. Be cautious with small objects, especially around children. Learn proper first aid techniques, including the Heimlich maneuver, through courses offered by organizations like the American Red Cross or the American Heart Association. Being prepared can help you save a life if choking happens.


 Login with Google
 Login with Facebook