
![First Aid If a Choking Victim is Too Large [Step-by-Step]](https://willnice.net/wp-content/uploads/2024/11/willnice-if-a-choking-victim-is-too-large-banner-1220x670.jpg)
Choking can happen to anyone, but what if the victim is too large for standard abdominal thrusts?
In this comprehensive guide, we'll show you how to effectively use chest thrusts as a lifesaving alternative when you can't easily wrap your arms around the victim's waist. This ensures you're prepared to act swiftly and effectively in choking emergencies.
Note: If you are alone with a conscious choking victim, administer 5-10 chest thrusts before dialing 911. If others are present, instruct someone to call for emergency services while you provide first aid.
Assessing the Choking Victim's Condition Before First Aid
If the choking victim can still cough, cry, or speak
Encourage them to continue coughing, which can help dislodge the obstruction. Constantly monitor their condition, stay with the choking victim, and be ready to provide further assistance if their condition worsens.
If the choking victim cannot speak, cough, or breathe
This indicates a severe choking (complete airway obstruction) incident. Review the signs and symptoms of severe choking listed below. If any are present, emergency first aid is necessary, and you must act immediately.
Check for Choking Signs and Symptoms
Identify complete airway obstruction in a choking victim by these signs:
- Clutching throat with hands
- Unable to cough, speak, or cry
- Weak or no cough
- High-pitched squeaking noises or no sound
- Pale or blue skin (or lips, nails) color, indicating a lack of oxygen in the blood.
- Panicked, confused, or surprised appearance
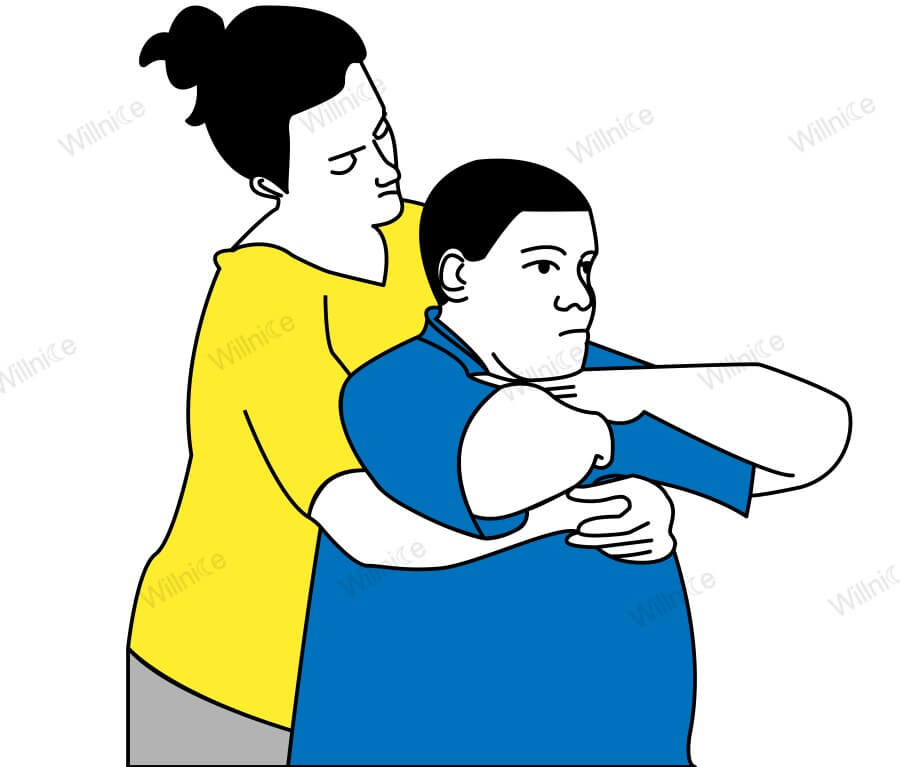
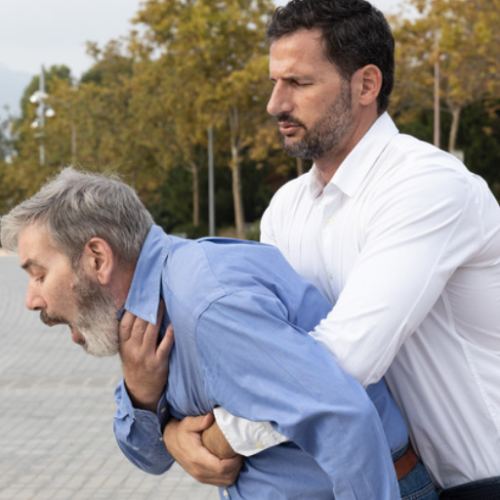
Tailored First Aid If a Choking Victim is Too Large
Step 1 Positioning
For the Rescuer:
- Stand behind the choking person.
- Wrap your arms around their chest.
For the Choking Victim:
- Stand if possible.
- If standing is difficult, help them sit in a sturdy chair. Perform chest thrusts from behind.
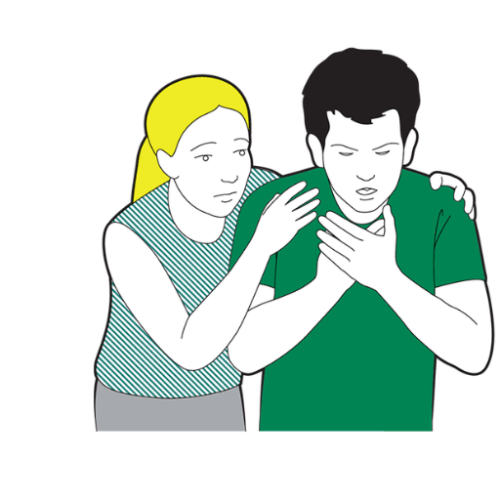
Step 2 Make a Fist
- Make a fit with one hand.
- Place your fist on the breastbone (in the center of the chest, between the nipples) of the choking victim.
- Cover your fist with your other hand.
Step 3 Give Five Inward Chest Thrusts
- To perform five firm and quick inward chest thrusts.
Step 4 Repeat giving the chest thrusts until
- The obstruction is cleared.
- The person can cough, cry, or speak.
- The person becomes unresponsive.
If the choking victim becomes unconscious or unresponsive, perform CPR
Step 1: Shout for help
- If Others Are Nearby: Direct someone nearby to call 911 and get an Automated External Defibrillator (AED) while you start CPR. Use the AED as soon as it arrives.
- If Alone Without a Phone: Perform 5 CPR cycles (30 compressions and 2 breaths each). Afterward, call 911 and get an AED.
- If Alone With a Phone: Call 911, use speaker mode, and proceed with CPR—30 compressions followed by 2 breaths.
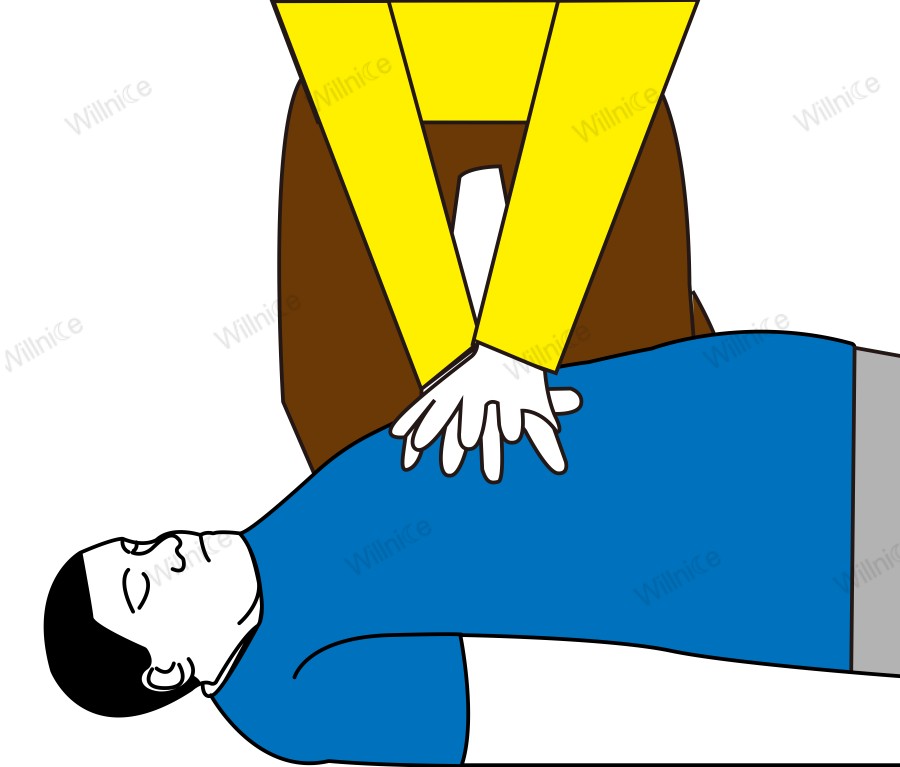
Step 2: Position the Choking Victim
- Carefully lower the choking person onto their back on a firm, flat surface.
Step 3: Give 30 Chest Compressions
- Place the heel of one hand in the center of the chest, just below the nipple line.
- Put your other hand on top, and interlace your fingers.
- Push down hard and fast at a rate of 100 to 120 compressions per minute. Each compression should be about 2 inches deep.
- Give 30 compressions per set.
- Allow the chest to return to normal position after each compression
- Do not pause compressions for more than 10 seconds.
Step 4 Look for Obstruction
After each compression set and before attempting breaths:
- Open the person’s mouth.
- Check for visible objects.
- If you see an object and it is easily accessible, gently remove it with your pinky. Be careful not to push the object deeper into the airway.
- If you do not see an object, or it is not easily removable, do not attempt a blind finger sweep.
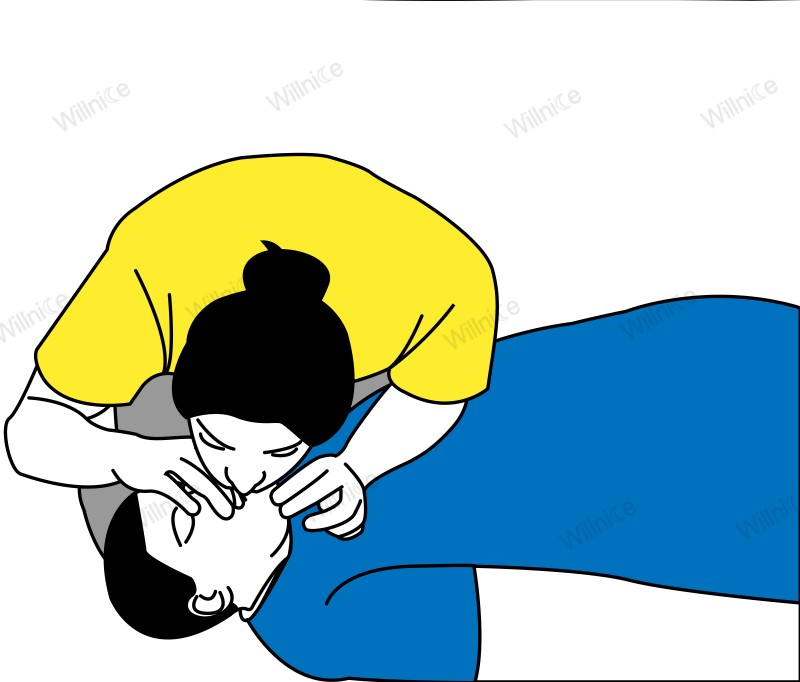
Step 5: Give 2 breaths
- Open the person’s airway, using the head-tilt, chin-lift maneuver.
- Pinch the nose shut, take a normal breath, and form a complete seal over the person's mouth with your own.
- Give 2 quick breaths into the person’s mouth, each lasting about 1 second.
- Watch for the chest to rise which indicates that the breaths are effective.
Step 6: Repeat sets of 30 compressions and 2 breaths until:
- The person shows signs of life (moves, speaks, blinks, or reacts).
- EMS/paramedics take over.
- An AED (automated external defibrillator) is ready to be used.
Note:
As soon as an AED is available, apply it and follow the prompts. Always ensure that no one is touching the victim when delivering a shock.
In some cases, the rescuer may not have sufficient strength to perform chest thrusts effectively on a choking victim who is particularly large or obese. If chest thrusts fail to clear the obstruction in such individuals, consider using a professional anti-choking device.
This device is designed for ease of use, employing a "Push and Pull" action that creates strong suction under powerful negative pressure to effectively remove any foreign object lodged in the throat, without requiring significant physical effort.
It's advisable to have this anti-choking device on hand as an additional safety measure to help prevent choking incidents.

Choking Aftercare: Medical Evaluation
Even if the choking victim recovers, they should see a healthcare provider to assess any potential internal injuries or complications from the choking incident.
Also Read


 Login with Google
 Login with Facebook