


Choking is a life-threatening emergency that may manifest itself in a child who is less than one year old. Children in that age bracket tend to put objects in their mouths and explore. The main purpose of this blog is to provide primary first aid- the measures of self-response and self-defensive that adhere to the principles of first-aid practice for choking- to parents, relatives, or any other person looking after an infant. We'll also cover the steps necessary to evaluate and respond to an emergency swiftly, with the most important rule being to stay serene during such instances. From comprehending what choking looks like to employing back blows and thrusts to the chest and practical instruction, this handbook teaches the discipline of effectively managing such emergencies as choking. Forewarned is forearmed, and by being forewarned, the Accident can be avoided and maybe a life saved.

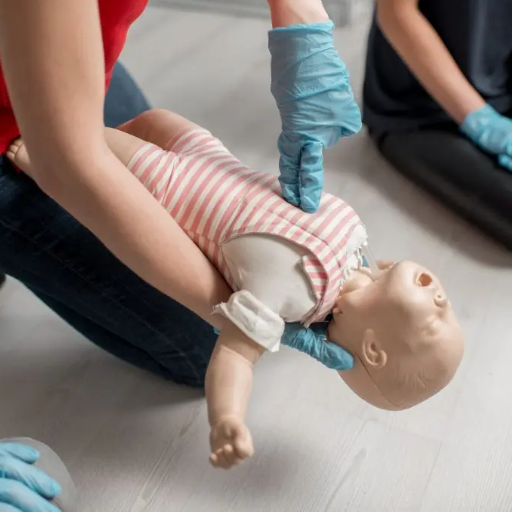
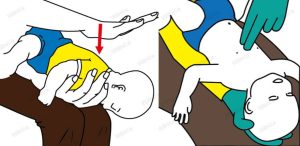
 When managing a choking infant, the first step is to check to see if the baby is genuinely choking or just coughing or crying, both signs of a more severe obstruction. Place the child face-down along your forearm with its head supported, and then proceed to strike its back in between the shoulder blades, making up to five attempts. If the obstruction fails to dislodge, roll the kid over on his/her back and push downward over the middle of the chest with two fingers up to five times. Continue the cycle of several blows to the back and chest thrusts until the obstruction is dislodged or medical assistance is given. At all times, the infant needs to be watched closely, even while performing these procedures. Emergency medical assistance should be obtained at any stage of time when perhaps the force may not seem to be enough.
The American Red Cross has outlined step-by-step procedures for dealing with a choking baby in a manner that guarantees safety and effectiveness during the intervention. First, they recommend a sequence of five back slaps followed by five forceful chest squeezes. It is essential to understand that the infant needs to be in the correct position. Their head should be positioned lower than their upper body so that gravity assists the relief process. At all times in performing the procedure, the head and neck of the infant must be kept stable, the amount of force used should not be excessive so that injuries can be avoided, and efforts should be made to check whether the obstruction of the airway has been removed. If there is no success in the first attempt, the caregiver must continue alternating back slaps with forceful squeezes to the chest and must seek medical care without any delay.
Under one year of age, babies are at the highest risk of choking. This is because their airways are very narrow, and as babies tend to explore the world around them with their mouths, any choking hazard placed into their mouths becomes challenging to remove. Choking is usually observed within the infant population due to the consumption of several small hard foods, including nuts, popcorn, raw carrots, or whole grapes. In addition, sticky or chewy foods such as peanut butter and marshmallows can pose a danger. Furthermore, babies are often seen choking on non-edible small objects but are frequently used as extending toys for babies, such as small coins, buttons, or even balloons. Therefore, caregivers should always observe babies adequately or remove any small objects that may be ingested from their surroundings.
When managing a choking infant, the first step is to check to see if the baby is genuinely choking or just coughing or crying, both signs of a more severe obstruction. Place the child face-down along your forearm with its head supported, and then proceed to strike its back in between the shoulder blades, making up to five attempts. If the obstruction fails to dislodge, roll the kid over on his/her back and push downward over the middle of the chest with two fingers up to five times. Continue the cycle of several blows to the back and chest thrusts until the obstruction is dislodged or medical assistance is given. At all times, the infant needs to be watched closely, even while performing these procedures. Emergency medical assistance should be obtained at any stage of time when perhaps the force may not seem to be enough.
The American Red Cross has outlined step-by-step procedures for dealing with a choking baby in a manner that guarantees safety and effectiveness during the intervention. First, they recommend a sequence of five back slaps followed by five forceful chest squeezes. It is essential to understand that the infant needs to be in the correct position. Their head should be positioned lower than their upper body so that gravity assists the relief process. At all times in performing the procedure, the head and neck of the infant must be kept stable, the amount of force used should not be excessive so that injuries can be avoided, and efforts should be made to check whether the obstruction of the airway has been removed. If there is no success in the first attempt, the caregiver must continue alternating back slaps with forceful squeezes to the chest and must seek medical care without any delay.
Under one year of age, babies are at the highest risk of choking. This is because their airways are very narrow, and as babies tend to explore the world around them with their mouths, any choking hazard placed into their mouths becomes challenging to remove. Choking is usually observed within the infant population due to the consumption of several small hard foods, including nuts, popcorn, raw carrots, or whole grapes. In addition, sticky or chewy foods such as peanut butter and marshmallows can pose a danger. Furthermore, babies are often seen choking on non-edible small objects but are frequently used as extending toys for babies, such as small coins, buttons, or even balloons. Therefore, caregivers should always observe babies adequately or remove any small objects that may be ingested from their surroundings.
What Should You Do If a Baby Is Choking?

Identify the Signs of a Choking Baby
There is more than one suffocation sign, which, when recognized quickly, can be a lifesaver as they can help to bottle a choking. The most conspicuous of which is the disturbance of normal breathing, absence of breath entirely, absence of adequate or strong cough reflexes, and crying or other vocal activity to bear witness to the distressed state of the infant. The infant might be gasping for air, too, with loss of oxygen showing in a bluish tinge to the skin color about the lips or areas around the face. Another potential obstruction in the throat can be noted; high exhalation of sound while they are trying to suck. Disturbance of a baby’s suffocation episode is also manifested through jerking of the body or arms, which usually indicates anxiety. These signs are critical and require immediate action to re-establish airway patency to prevent the infant from any further trauma.How to Perform Back Blows and Chest Thrusts
First, to perform the back blows or the whole back of babies upcoming, and when undertaking this step, I need to take the baby and put them into my forearm as in a somersault position, holding their head and neck. I use the heel of the hand to perform five back slaps on the infant’s back in the area between its shoulder blades. If the object remains in place, I switch the head-up position of the baby with the head in a lower position than the chest and prepare to perform thrusts. In this case, with the help of two fingers, I push the center of the breast five times below the nipple line where there is some space. I will continue with this unit and the back slaps unit until all five slaps and chest thrusts have been completed satisfactorily, or someone can come to provide the necessary assistance. I have come to appreciate the need to keep a cool head throughout this exercise, as this is critical to the safety and health of the baby.When to Call for Emergency Help
What circumstances call for contacting emergency services? When the infant is choking but does not respond when back blows and chest thrusts are attempted, this is the moment when I will make the emergency call. It is essential to call 911 or the nearest emergency number immediately when the infant is already unconscious. Also, after several attempts, I don’t pull out the object stuck inside the child’s throat, and if the child’s signs of distress increase, I will have no option but to go to the doctor. Until assistance arrives, I will continue with the first aid procedures and take measures to ensure the infant's safety.
How to Perform Choking First Aid for Babies Under 1 Year
Performing choking first aid for babies under 1 year requires quick and careful action. Start by ensuring the baby's safety. If the baby is choking but can still breathe or cough, monitor them closely until the object dislodges. If the baby cannot breathe, cough, or cry, immediately begin the first aid procedure.
- Positioning the Baby:
- Lay the baby face down along your forearm, resting their head lower than their chest.
- Support their head and neck with your hand.
- Administering Back Blows:
- With the heel of your other hand, deliver up to five firm back blows between the baby's shoulder blades.
- Performing Chest Thrusts:
- If the object does not dislodge, turn the baby face up while ensuring the head remains lower than the chest.
- Use two fingers to press on the middle of the chest, just below the nipple line, delivering up to five chest thrusts.
- Cycle and Observation:
- Repeat the cycle of five back blows and five chest thrusts until the object is cleared.
- Emergency Assistance:
- If the obstruction persists or the baby becomes unresponsive, call for emergency help immediately while continuing first aid.
Remember to remain calm and focused throughout the process to ensure the baby's safety and well-being.
Understanding Choking Hazards and Prevention
Small, round, complex, or sticky foods such as nuts, grapes, and pieces of hard vegetables, together with other small objects like coins or buttons, are common choking hazards for babies below the age of 1. Babies should be watched while eating and playing to reduce the likelihood of choking occurrences. Always make sure that toys are more comprehensive in size than the mouth of the child and devoid of loose-fitting parts that may be ingested. When giving solid foods to a child, ensure they are cut into small, digestible pieces. It is equally essential to eliminate all minor hazards from the floors and surfaces easily reached. If these preventive measures are taken, there is an increased probability of reducing the choking hazard and thus enhancing the safety of babies.Step-by-Step Guide to Infant CPR
- Check Responsiveness:
- Begin by gently tapping the infant and shouting their name to see if there is any response.
- Call for Help:
- If the infant does not respond, shout for help and call emergency services. If you're alone, carry the infant with you to the phone.
- Position the Infant:
- Lay the infant on a firm, flat surface like a table or the ground.
- Open the Airway:
- Tilt the infant’s head slightly and lift the chin to open the airway. Be careful not to overextend, as infants' necks are delicate.
- Check for Breathing:
- Look, listen, and feel for breathing for no more than 10 seconds. If there is no breathing or only gasping, prepare to give CPR.
- Begin Chest Compressions:
- Place two fingers in the center of the infant’s chest, right below the nipple line. Press down about 1.5 inches and allow the chest to return to its normal position, completing 30 compressions at 100-120 per minute.
- Give Rescue Breaths:
- After 30 compressions, give two gentle breaths. Cover the infant’s mouth and nose with your mouth, creating a seal. Each breath should last about 1 second and raise the chest.
- Continue CPR:
- Repeat cycles of 30 compressions and two breaths until help arrives or the infant starts breathing.
Remember, staying calm and focused is crucial while performing CPR on an infant. Quick and effective action can make a significant difference in a life-threatening situation.
Common Mistakes to Avoid During Choking First Aid
Staying calm is critical during a choking episode; responding inappropriately to the situation will only worsen things. In the first instance, I should not exert force when delivering the back blows or the abdomen thrusts, also referred to as a Heimlich thrust, since it may worsen the injury. In a second scenario, I apply techniques indiscriminately without determining the person's age, size, and weight. Another error is failing to switch between giving back blows and abdominal thrusts, which should increase the odds of removing the obstruction in the patient. Barring extreme cases, if the person has managed to speak or cough, there is no need to do anything since they are attempting to expel the foreign body by themselves. One must be careful of such simple errors; otherwise, the performance is likely to deteriorate instead of being improved.
What Are the Essential First Aid Techniques for Choking in Babies?
 When managing a choking infant, the first step is to check to see if the baby is genuinely choking or just coughing or crying, both signs of a more severe obstruction. Place the child face-down along your forearm with its head supported, and then proceed to strike its back in between the shoulder blades, making up to five attempts. If the obstruction fails to dislodge, roll the kid over on his/her back and push downward over the middle of the chest with two fingers up to five times. Continue the cycle of several blows to the back and chest thrusts until the obstruction is dislodged or medical assistance is given. At all times, the infant needs to be watched closely, even while performing these procedures. Emergency medical assistance should be obtained at any stage of time when perhaps the force may not seem to be enough.
Proper Positioning of the Infant's Chest and Head and Neck
To position an infant for treatment to reverse a choking emergency, the first step is to begin laying the baby in a face-down position on the forearm, which is propped on a thigh. Ensure the infant’s head is lower than the body, which will help gravity pull the obstruction out. Hold the jaw with the thumb and fingers to support the infant's head and neck, avoiding pressure on the throat. When administrating back blows, avoid arcing or twisting the spine while delivering the infant’s torso. For chest thrusts, put the baby in a prone position on your forearm, supported on your thigh, and place two fingers in the center of the breastbone and the head lower than the shoulders. Maintain a gentle grip to avoid jerking motions likely to lead to injury and perform back thrusts followed by chest thrusts until the airway is clear or assistance is available. These treatments should be performed very carefully because the infant is delicate.Using the Heel of Your Hand for Back Blows
I start by observing how I am supposed to position the infant on the forearm, face down, with the head lower than the body. I am supposed to grasp the child’s jaw and strike the back of his or her shoulder blades firmly and gently up to five times. The baby is rotated around the axis of his or her center of mass using gravity and impact force. I do not apply excessive pressure on the infant’s head and neck but provide some support and watch for any kind of response from the infant in anticipation of utilizing chest thrusts if warranted.
Performing 5 Chest Thrusts Effectively
- Position the Infant: With the baby on its back, rest it along your forearm supported by your thigh. Ensure the baby's head is lower than its chest for optimal position.
- Use Two Fingers: Place the middle and ring fingers of your free hand on the center of the infant's breastbone, just below the nipple line.
- Apply Pressure: Press gently but firmly to deliver five quick chest thrusts. Each thrust should compress the chest about 1.5 inches (4 cm).
- Maintain Control: Control the infant's head and body. Avoid exerting excessive force that might cause injury.
- Observe Response: Watch for any signs that the obstruction is dislodged. Alternate between chest thrusts and back blows until the airway is clear or professional help arrives.
How Does the American Red Cross Recommend Handling a Choking Baby?
 The American Red Cross has outlined step-by-step procedures for dealing with a choking baby in a manner that guarantees safety and effectiveness during the intervention. First, they recommend a sequence of five back slaps followed by five forceful chest squeezes. It is essential to understand that the infant needs to be in the correct position. Their head should be positioned lower than their upper body so that gravity assists the relief process. At all times in performing the procedure, the head and neck of the infant must be kept stable, the amount of force used should not be excessive so that injuries can be avoided, and efforts should be made to check whether the obstruction of the airway has been removed. If there is no success in the first attempt, the caregiver must continue alternating back slaps with forceful squeezes to the chest and must seek medical care without any delay.
When to See the Object and Try to Remove It
In a situation where there is a choking infant, upon seeing the object stuck in the infant’s mouth, I attempt to remove the object, but I don’t want to push the object further down the throat. I only make these attempts where I have complete assurance that I can grasp the object. If not, there is no hesitation in carrying out back blows and vertical dry chest thrusts until medical help and treatment are available.When a Baby Becomes Unresponsive and Requires CPR
In situations when a baby is nonresponsive, I do not wait any further, and I perform CPR. I ensure the baby is lying on his back on a hard, flat surface. I place my two fingers at 2 inches below the nipples and give at least 30 cycles of sternum compressions at a speed ranging from 100 to 120 cycles per minute and to a depth of about 1.5 inches. After the compressions, I provide artificial breaths, two in number. To do this, I place my hands on the head and neck and gently tilt the head back while cupping the chin till the mouth opens, seal the baby’s mouth with my mouth, and then blow into the mouth twice. If chest expansion is not noted, I turn the head of the baby and blow air into the mouth and nose again. If either the baby resists or starts breathing, I stop the cycle. The cycle consists of thirty compressions combined with two breaths and is repeated until the arrival of help.
What Are the Most Common Choking Hazards for Babies Under 1 Year?
 Under one year of age, babies are at the highest risk of choking. This is because their airways are very narrow, and as babies tend to explore the world around them with their mouths, any choking hazard placed into their mouths becomes challenging to remove. Choking is usually observed within the infant population due to the consumption of several small hard foods, including nuts, popcorn, raw carrots, or whole grapes. In addition, sticky or chewy foods such as peanut butter and marshmallows can pose a danger. Furthermore, babies are often seen choking on non-edible small objects but are frequently used as extending toys for babies, such as small coins, buttons, or even balloons. Therefore, caregivers should always observe babies adequately or remove any small objects that may be ingested from their surroundings.
Identifying Small Objects and Foods to Avoid
When trying to prevent choking in a baby under the age of one year, everything that is both a food and a non-food item that the baby can utilize must be closely checked as they will grab for anything that is near. The choke food items include whole grapes, cherry tomatoes, nuts, hard candies, popcorn, and big pieces of meat or cheese, which could be rendered safe for a baby by cutting grapes and tomatoes into smaller pieces. Large puffs of peanut butter can also be dangerous since they can quickly get “glued” to the baby’s throat. It is wise to use toys without tiny swallowable parts for non-food hazards and monitor the surroundings for stray coins, buttons, marbles, batteries, and balloons. So, finally, the parents would like to take many such precautions to prevent further choking.Simple Prevention Tips to Keep Your Child Safe
My child and choking is a concern that I, as a caregiver, would never want to deal with. Foods that are round or small are cut into little pieces, often tiny in size, and are only offered on suitable occasions. Further, I do not give my child nuts, popcorn, or candies until he is much older, and only soft foods that can be transferred easily are chosen. Peanut butter is applied wispily and thinly with eyes on the child. I also make it a point to regularly scan play areas for choking hazards like coins, buttons, or small toy parts that might be left around. Through these actions, it becomes possible to limit the occurrence of choking episodes and protect my child’s health and safety.Understanding Airway Blockage and How to Respond
In children, small objects such as food or toys can get stuck in the throat and obstruct air passage. It is essential to note and understand the signs of blocked airways, which could involve difficulty breathing, crying without the sound, and gag reflexes. Even when a child is experiencing extreme blockage, inhaling, coughing, and vocalization are not occurring, these circumstances should be treated immediately with the Heimlich maneuver appropriate for infants and children. An infant can be positioned on a caregiver’s forearm and given five firm pats between the shoulder blades, followed by five quick thrusts inwards and upwards below the breastbone. If symptoms persist, it is crucial not to neglect these and request urgent medical help. Parents should remember that standard airway measures in infants and children are of a smaller caliber than in adults, and therefore, there is a higher chance of choking. Also, toys with small parts or unsuitable for children of the appropriate age should never be used or supplied. Therefore, it is the parent’s responsibility to consider the features given and act accordingly to prevent risk and help save the child’s life in severe cases.References
Choking First aid Cardiopulmonary resuscitationFrequently Asked Questions (FAQ)
Q: What should I do first if a baby under 1 year is choking?
A: If a baby is choking, the first thing to do is to assess if the infant is coughing forcefully or not. Encourage them to cough if they can. If they cannot cough, cry, or breathe, you must immediately perform first aid for choking.Q: How do I position a baby for choking first aid?
A: Lay the baby face down along your forearm, ensuring you support their head and neck. Hold the infant's chest in your hand, with their head lower than their body, and rest your arm on your thigh for support.Q: How do I perform back blows on a choking baby?
A: With the baby positioned face down, deliver up to 5 back blows using the heel of your hand between the infant's shoulder blades. These back blows can help dislodge the object causing the airway obstruction.Q: What should I do if back blows do not dislodge the object?
A: If back blows don't dislodge the object, turn the baby face up along your forearm and give up to 5 chest thrusts. Use two fingers in the center of the infant's chest, slightly below the nipple line, and press down about 1.5 inches.Q: What is the next step if the object is und dislodged?
A: If the object remains lodged, continue alternating between 5 back blows and five chest thrusts until the object is dislodged or the baby becomes unconscious. Call for medical help during this process.Q: What should I do if the baby becomes unconscious during choking?
A: If the baby becomes unconscious, start CPR immediately. Follow the guidelines you learned in a baby first aid or CPR course, and continue until professional medical help arrives or the baby recovers.Q: How can I prevent choking in babies?
A: Prevent choking by ensuring small objects and foods that can cause airway obstruction are out of reach. Always supervise babies during meals and playtime. Taking a first aid course can also prepare you for emergencies.Q: Where can I find reliable first-aid advice for choking?
A: Reliable first aid advice can be found on reputable sites like the MedlinePlus Medical Encyclopedia, St John Ambulance, and through certified first aid courses. These resources provide comprehensive guidance on handling choking and other emergencies.Q: Why is it important to seek medical help even after the object is dislodged?
A: It's crucial to seek medical help after the object is dislodged to ensure no airway damage or other complications. A healthcare professional can assess the baby's condition thoroughly.2140


 Login with Google
 Login with Facebook