![How to Perform Infant CPR: First Aid & Tips [Step-by-Step]](https://willnice.net/wp-content/uploads/2024/11/infant-cpr-1220x669.jpg)
Cardiac arrest can strike at any moment. When an infant's breathing and heartbeat suddenly stop, every second counts.
This ultimate guide equips you with crucial CPR skills tailored for infants, ensuring you’re prepared to act effectively in a cardiac or respiratory emergency, potentially saving your baby's life before emergency medical services can take over.
What is CPR?
CPR, or cardiopulmonary resuscitation, is a critical life-saving technique used when an infant’s heartbeat or breathing has stopped. Common situations requiring CPR include drowning, suffocation, choking, or severe injuries.
Here’s a simplified breakdown of what CPR involves:
- Chest Compressions: These help pump blood from the heart to the rest of the body, which keeps the blood flowing.
- Rescue Breathing: This technique supplies the lungs with oxygen.
Why CPR is Critical?
If an infant stops breathing, they are not getting the oxygen needed to survive. Without oxygen, the heart will soon stop, and brain damage or death can occur within minutes.
You must continue CPR until the infant's heartbeat and breathing return, or until trained medical help arrives. CPR is crucial because it keeps oxygenated blood flowing, which helps prevent brain damage and death.
Causes of Cardiac Arrest in Infants
- Choking: Objects obstructing the airway can cut off breathing.
- Drowning: Submersion in water can fill the lungs with fluid, stopping effective breathing.
- Electrical Shock: Can interfere with cardiac function.
- Excessive Bleeding: Leads to a critical decrease in blood volume, affecting heart function.
- Severe Injury: Such as head trauma, can disrupt vital signs.
- Lung Disease: May severely limit the ability to breathe.
- Poisoning: Toxic substances can inhibit breathing and heart rate.
- Suffocation: Blocks air from entering the lungs.
When to Perform CPR on an Infant?
CPR should be done if an infant has any of these symptoms, indicating life-threatening conditions:
- No Breathing or Only Gasping: Indicates the lungs are not receiving or exchanging air.
- No Pulse: Indicates the heart has stopped pumping blood.
- Unconsciousness: The infant does not respond to touch or sounds and is unresponsive.
In a word: Unresponsive + No breathing or only gasping = Provide CPR Immediately
Note: If the infant is breathing normally, coughing, or showing movement, do not start chest compressions as this could inadvertently stop the heart.
Before Giving Baby CPR
Step 1 Check for Responsiveness (Shout-Tap-Shout)
- First, try to get the baby's attention by shouting their name.
- If there’s no response, gently tap the bottom of their foot.
- Shout again while quickly checking for signs of breathing or other severe symptoms, but do not check for longer than 10 seconds.
Note: Remember, never shake an infant. If the baby remains unresponsive and isn’t breathing or is only gasping, begin CPR immediately.
Step 2: Shout for Help
- If Others Are Nearby: Direct someone nearby to call 911 and get an Automated External Defibrillator (AED) while you start CPR. Use the AED as soon as it arrives.
- If Alone Without a Phone: Perform 5 CPR cycles (30 compressions and 2 breaths each). Afterward, take the infant with you to call 911 and get an AED.
- If Alone With a Phone: Call 911, put the phone on speaker mode, and continue CPR with 30 compressions followed by 2 breaths.
Perform Infant CPR Like a Pro: A Visual Step-by-Step Guide
Step 1: Properly Position the Infant
- Lay the infant on their back on a firm, flat surface like a table or the ground.
- Stand or kneel beside the baby at a slight angle.
- Quickly remove any clothing that obstructs access to the infant's chest.
Note: If a spinal injury is suspected and another responder is present, carefully move the infant together to avoid twisting the head and neck. If alone, minimize movement of the infant's head and neck.
Step 2: Give 30 Chest Compressions
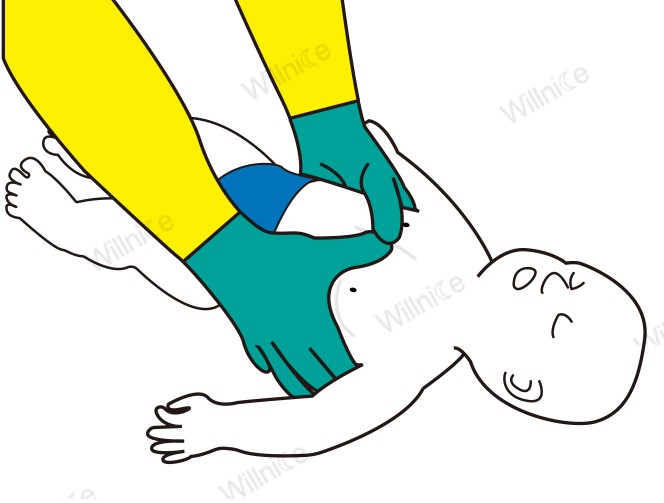
Way 1: Using Both Thumbs Technique
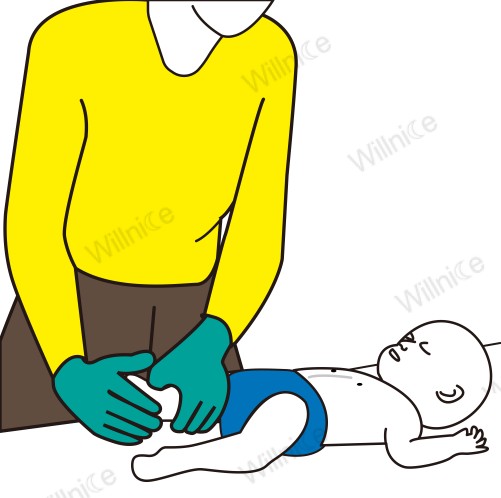
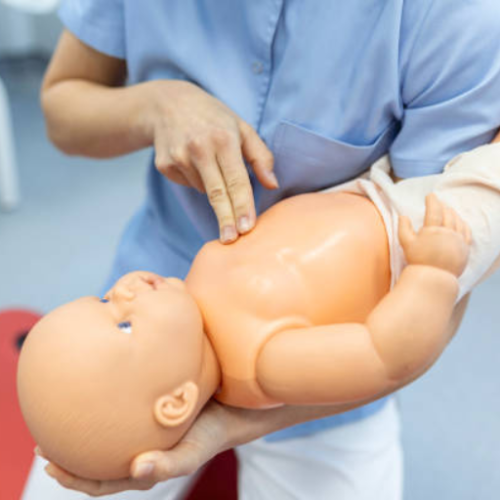
- Place both thumbs side by side on the center of the baby’s chest, just below the nipple line.
- Encircle the infant’s back with your other fingers to offer firm support and maintain proper positioning.
- Using both thumbs, press down firmly on the chest about 1.5 inches deep, 30 times at a rate of 100 to 120 compressions per minute.
- Ensure compressions are fast and continuous, allowing the chest to fully rise after each compression. Count aloud quickly to maintain pace: "1,2,3...28,29,30."
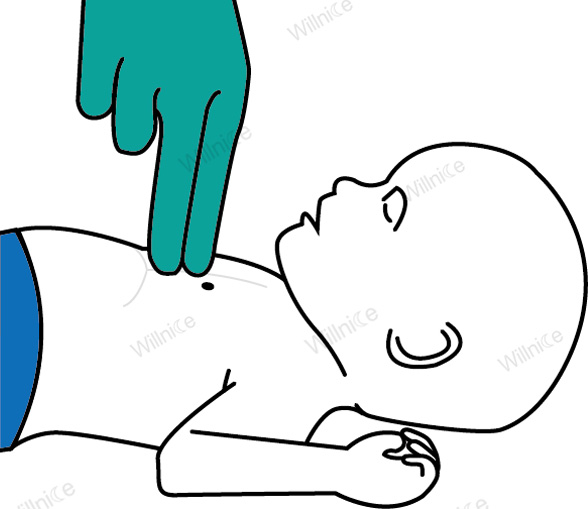
Way 2: Using Two-Finger Technique
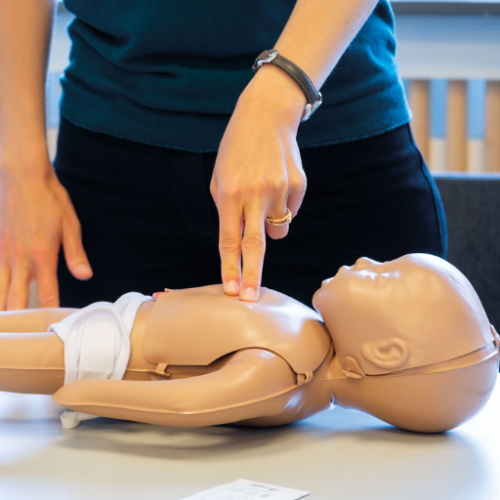
- Place two fingers in the center of the chest, just below the nipple line.
- Press down the chest approximately 1.5 inches deep at a rate of 100 to 120 compressions per minute.
- Perform 30 quick, firm compressions with no pausing. Count rapidly: "1,2,3...28,29,30."
- Allow the chest to rise completely after each compression.
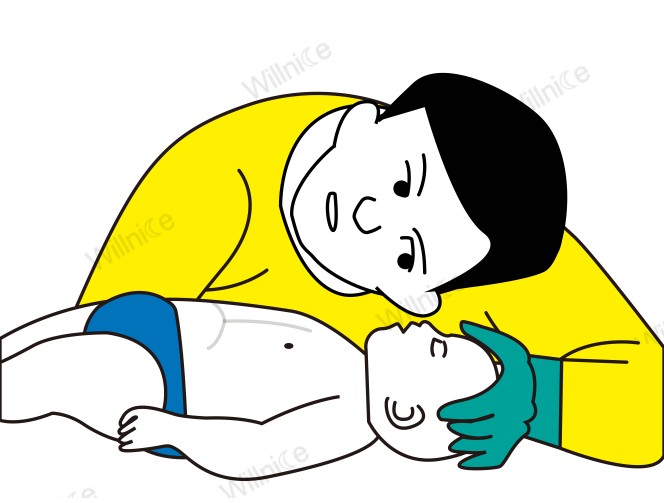
Step 3: Check for Breathing
- Open the airway to a neutral position using the head-tilt/chin-lift technique.
- Place your ear near the infant's mouth and nose. Look for chest movements, listen for breathing sounds, and feel for breath against your cheek.
- If the infant is not breathing, give 2 rescue breaths.
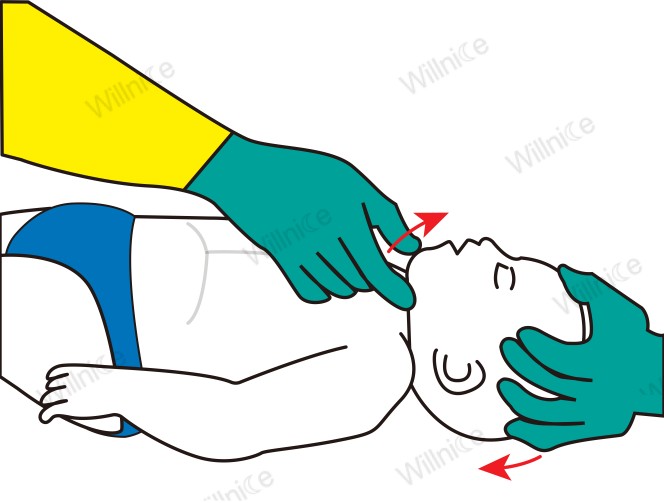
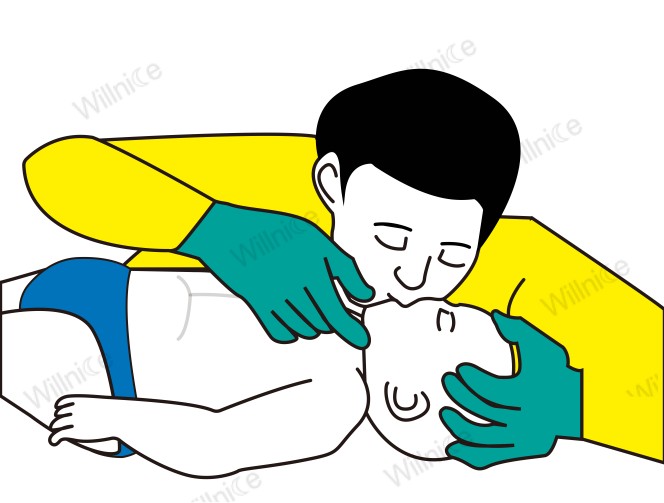
Step 4 Give 2 Breaths
- Cover both the infant’s mouth and nose with your mouth to create an airtight seal.
- Blow 2 quick breaths into the infant’s mouth, each about 1 second long. Ensure each breath visibly raises the chest.
Note: If the chest does not rise with the first breath, adjust the head tilt and check the seal over the infant's mouth and nose before attempting the second breath. If the second breath also fails to raise the chest, the airway may be blocked.
Step 4: Repeat sets of 30 compressions and 2 breaths until:
- The infant shows signs of life (moves, cries, speaks, blinks, or reacts).
- Emergency Medical Services (EMS) arrive.
- An AED is ready to use
Considerations for Performing CPR on Infants
CPR should ideally be performed by someone trained through an accredited course. All parents and caregivers should be trained in infant CPR. Look for accredited CPR courses in your area to ensure you're prepared.
Time is critical when an infant is unconscious and not breathing. Brain damage can begin after just 4 minutes without oxygen, and death can follow within 4 to 6 minutes.
Automated external defibrillators (AEDs) are lifesaving devices found in many public areas and available for home use. Equipped with pads or paddles, AEDs are placed on the chest during critical emergencies to automatically assess heart rhythm and deliver a shock only when necessary to restore normal heart function. Ensure the AED is suitable for infants and always adhere strictly to the provided instructions.
Keeping Infants Safe: Strategies to Avoid Health Emergencies
Ensuring the safety of infants and reducing the likelihood of situations that may require CPR involves vigilant supervision and preventive measures. Here are some essential tips to help safeguard infants from common hazards:
Constant Supervision:
- Never leave an infant unattended. Active supervision is crucial, especially during activities such as bathing, eating, and playing.
- Do not allow them to crawl or walk around with food or bottles
- Never leave an infant alone on a bed, table, or any elevated surface where they could roll off.
Safe Sleeping Practices:
- Use a firm mattress in a safety-approved crib. Soft mattresses, couches, or armchairs can increase the risk of suffocation.
- Keep the crib clear of pillows, blankets, and toys, which can obstruct an infant’s airway.
- Always place infants on their backs to sleep. This position is safest and reduces the risk of Sudden Infant Death Syndrome (SIDS) and suffocation.
Feeding Safety:
- Monitor infants during and after feeding. Ensure they are upright or appropriately supported to prevent choking or regurgitation that could lead to suffocation.
Choking Prevention:
- Food Safety: Introduce solid foods according to a pediatrician's guidelines. Ensure all food items are soft, small enough to swallow, and appropriate for the infant’s developmental stage.
- Toy Safety: Only provide toys that are large enough not to be swallowed and do not have small parts that could detach and become lodged in the throat.
Learn Infant Heimlich Maneuver and CPR: Parents and caregivers should be trained in infant CPR and the appropriate measures to relieve choking in infants. These skills are critical during emergencies and can save lives before professional help arrives.
Childproofing the Home: Secure the environment by:
- Using safety locks on cabinets containing hazardous substances.
- Keeping small objects, especially tiny household items and toxic substances, out of reach.
- Ensuring that older children’s toys, which may have small parts, are kept away from infants.
Water Safety: Never leave an infant unattended in or near water, including bathtubs, buckets, and pools. Water safety devices should be used, and pools should have childproof barriers.
Fire Safety and Smoke Alarms: Install and maintain smoke alarms in your home. Practice fire safety by planning escape routes and keeping fire hazards away from infants.
Avoiding Overheating: Dress infants in suitable clothing to prevent overheating, another risk factor for SIDS. Avoid wrapping or covering an infant’s face or head.
Car Seats Safety: Infants should remain in a rear-facing car seat. This position supports the baby's head, neck, and spine in crashes. Always secure infants with safety straps in high chairs and strollers. Do not let an infant stay in a mesh playpen if one side is lowered.
FAQs
When Performing CPR on an Infant?
Perform CPR on an infant in situations where they are not responding (unconscious) and not breathing normally ( no breathing or only gasping breaths). These signs suggest that the infant may be in cardiac arrest, and first aid is crucial to help restore their breathing and circulation.
Is infant CPR 15 or 30 compressions?
For infant CPR, when performed by a single rescuer, the recommended ratio is 30 compressions followed by 2 breaths. However, if two rescuers are available, the compression-to-breath ratio changes to 15 compressions followed by 2 breaths.




 Login with Google
 Login with Facebook