


Cardiac arrest can strike without warning, leaving mere minutes to act and save a life. Hands-Only CPR, a simplified version of traditional CPR, empowers bystanders to step in and provide life-saving assistance with just chest compressions. This guide explores everything you need to know about Hands-Only CPR—from understanding its importance and mastering the technique to recognizing emergencies and encouraging others to learn. Whether at home, in public, or at work, this essential skill can turn ordinary individuals into heroes when it matters most.
Understanding Hands-Only CPR
A Simple, Life-Saving Technique: What It Is and Why It Matters
Hands-Only CPR is a streamlined version of traditional cardiopulmonary resuscitation (CPR) that focuses solely on chest compressions without mouth-to-mouth breaths. This method is designed to be simple and accessible, making it easier for bystanders to act quickly in emergencies. By maintaining blood flow to vital organs, Hands-Only CPR can significantly increase the chances of survival for someone experiencing sudden cardiac arrest. The simplicity of this technique empowers more people to step in and help, even without formal medical training. Studies show that immediate action by a bystander can double or even triple the chances of survival, making Hands-Only CPR a critical skill for everyone to know.How It Differs from Traditional CPR and When It’s Most Effective
Unlike traditional CPR, which combines chest compressions with rescue breaths, Hands-Only CPR eliminates the need for mouth-to-mouth contact. This makes it particularly effective in situations where bystanders may hesitate to perform CPR due to concerns about hygiene or lack of training. Hands-Only CPR is most effective in cases of sudden cardiac arrest, especially in adults and teens. It’s important to note that this method is not recommended for infants, children, or drowning victims, as these scenarios often require rescue breaths to address oxygen deprivation. By focusing on high-quality chest compressions at a consistent rate of 100-120 compressions per minute, Hands-Only CPR ensures that oxygenated blood continues to circulate, buying critical time until professional medical help arrives.Why Hands-Only CPR Saves Lives
The Science Behind Its Effectiveness in Cardiac Emergencies
Hands-Only CPR works by maintaining blood circulation to vital organs, especially the brain and heart, during a cardiac arrest. When the heart stops beating, oxygen-rich blood no longer flows through the body, and brain cells can begin to die within minutes. By performing chest compressions at a steady rate of 100-120 compressions per minute, you help keep blood moving, buying critical time until emergency medical services arrive. Research shows that high-quality chest compressions can double or even triple survival rates in cardiac emergencies. The absence of rescue breaths in Hands-Only CPR simplifies the process, making it easier for bystanders to act quickly without hesitation. This immediate response is crucial, as survival rates drop by 7-10% for every minute without intervention.Real-Life Success Stories
Stories of survival highlight the life-saving potential of Hands-Only CPR. For example, a high school student in Texas saved a classmate who collapsed during gym class by performing chest compressions until paramedics arrived. Similarly, a bystander in a crowded train station in New York successfully revived a stranger using Hands-Only CPR, proving that anyone can make a difference with this simple technique. These real-world examples emphasize the importance of learning Hands-Only CPR. They show that you don’t need to be a medical professional to save a life—just the willingness to act and the knowledge of proper technique can turn an ordinary person into a hero.When to Use Hands-Only CPR
Identifying Situations Where Hands-Only CPR Is Appropriate
Hands-Only CPR is most effective in cases of sudden cardiac arrest, a condition where the heart unexpectedly stops beating. This technique is ideal when the person:- Is unresponsive: They do not react to tapping, shouting, or other attempts to wake them.
- Is not breathing or only gasping: Look for abnormal gasping sounds, often referred to as “agonal breathing,” which is a sign of cardiac arrest.
- Infants and children: These cases often require rescue breaths to address oxygen deprivation.
- Drowning victims: Rescue breaths are necessary to provide oxygen in these situations.
- Drug overdoses: Rescue breaths may also be needed to address respiratory failure.
Common Scenarios: At Home, in Public, or at Work
Sudden cardiac arrests can happen anywhere, often without warning. Recognizing these scenarios can help you act decisively:- At Home:
- Most cardiac arrests occur at home, often in the presence of family members. For example, a loved one may collapse in the living room or kitchen. Knowing Hands-Only CPR ensures you can provide immediate assistance while waiting for paramedics to arrive.
- In Public:
- Crowded places like parks, shopping malls, airports, or train stations are common locations for cardiac emergencies. If someone collapses in a public setting, quickly assess the situation, call for help, and begin chest compressions. Public AEDs (automated external defibrillators) are often available in these areas, so ask someone nearby to locate one while you perform CPR.
- At Work:
- Workplaces, especially those with high physical activity (e.g., construction sites) or high stress (e.g., corporate offices), can also see sudden cardiac arrests. Being prepared to assist a colleague who collapses can make a life-saving difference. Encourage your workplace to provide CPR training and have an AED on-site for emergencies.
Key Tips for Acting Quickly
- Stay Calm: Take a deep breath and focus on the steps of Hands-Only CPR.
- Assign Tasks: If others are present, delegate responsibilities like calling 911 or retrieving an AED.
- Don’t Hesitate: Even if you’re unsure, performing CPR is better than doing nothing. Immediate action can save a life.
How to Learn Hands-Only CPR
Step-by-Step Guide to Mastering the Technique
- Recognize the Emergency: If someone collapses, check if they are unresponsive and not breathing or only gasping. For example, if a coworker suddenly falls during a meeting and doesn’t respond to your voice or touch, they likely need CPR.
- Call for Help: Dial emergency services immediately or ask someone nearby to call. Assign someone specific to make the call to avoid confusion in crowded settings.
- Position Your Hands: Place the heel of one hand in the center of the chest, on the lower half of the breastbone. Stack your other hand on top and interlock your fingers. Keep your elbows straight and position your shoulders directly above your hands for effective compressions.
- Perform Chest Compressions: Push hard and fast at a rate of 100-120 compressions per minute. Use songs like “Stayin’ Alive” or “Baby Shark” to maintain the correct rhythm. Compress the chest about 2 inches deep and let it fully rise between compressions.
- Continue Until Help Arrives: Keep going until emergency responders take over or the person shows signs of life. If you feel fatigued, ask someone nearby to take over while maintaining the same rhythm and depth.
Tips for Building Confidence Through Practice
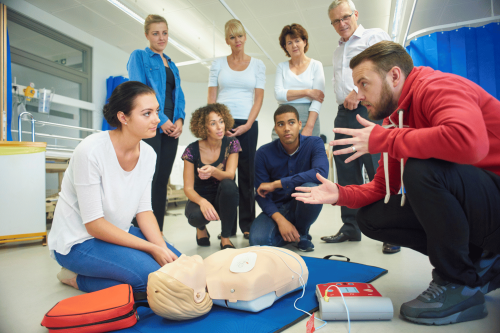
- Take a CPR Class: Join a local class offered by organizations like the American Heart Association or Red Cross. These sessions often include hands-on practice with mannequins that simulate real-life scenarios, helping you perfect your technique.
- Use Online Resources: Watch instructional videos from trusted sources like the AHA or Red Cross. Some platforms even offer interactive guides that allow you to practice virtually.
- Practice with a Metronome App: Download a metronome app or use a CPR-specific app like “PulsePoint Respond” to practice maintaining the correct compression rhythm.
- Simulate Real Scenarios: Practice with friends or family by role-playing emergency situations. For example, simulate a cardiac arrest at home and take turns performing CPR while others call for help.
- Address Common Challenges: If you struggle with maintaining compression depth, practice on a firm surface like a yoga mat or use a CPR mannequin with feedback features to improve your technique.
Steps to Deliver Hands-Only CPR
A Clear, Actionable Breakdown of the Process
1. Assess the Situation
If someone collapses, act quickly to determine if they need CPR. Follow these steps:- Check for responsiveness: Tap their shoulder firmly and shout, “Are you okay?” If they don’t respond, they may be unconscious.
- Look for breathing: Observe their chest for movement or listen for normal breathing. If they are not breathing or are only gasping (agonal breathing), they likely need CPR.
- Ensure the scene is safe: Before approaching, check for hazards like traffic, fire, or unstable surroundings to protect yourself and others.
2. Call for Emergency Help
Dial 911 or your local emergency number immediately. If others are nearby, assign someone specific to call for help. For example, point to a person and say, “You, call 911 and come back to tell me when it’s done!” This avoids confusion and ensures the call is made.- Provide clear information to the dispatcher, including the location, the victim’s condition, and that you are starting CPR.
- If you’re alone, use speakerphone to call while beginning chest compressions.
3. Position Yourself and Your Hands
Proper positioning is critical for effective compressions:- Kneel beside the victim: Ensure they are lying flat on a firm surface, such as the floor or ground.
- Locate the compression point: Place the heel of one hand in the center of their chest, on the lower half of the breastbone (sternum).
- Stack your hands: Place your other hand on top of the first, interlocking your fingers.
- Straighten your arms: Keep your elbows locked and position your shoulders directly above your hands to use your body weight for compressions.
4. Start Chest Compressions
Perform high-quality chest compressions to keep blood circulating:- Push hard and fast: Compress the chest at a rate of 100-120 compressions per minute. Use songs like “Stayin’ Alive” or “Baby Shark” to maintain the correct rhythm.
- Compress deeply: Push down at least 2 inches into the chest. Allow the chest to fully rise between compressions to let the heart refill with blood.
- Use your body weight: Avoid using just your arms—lean into the compressions with your upper body to apply enough force.
- Switch if fatigued: If someone else is available, take turns performing compressions every 2 minutes to maintain quality.
5. Continue Until Help Arrives
Do not stop compressions unless:- Emergency responders take over.
- The victim shows signs of life, such as moving, coughing, or breathing normally.
- You are physically unable to continue due to exhaustion.
- Pause compressions briefly to apply the AED pads and follow the device’s voice instructions.
- Resume compressions immediately after the AED delivers a shock or advises no shock is needed.
Key Tips for Success
- Stay Calm: Focus on the steps and take one action at a time.
- Don’t Worry About Perfection: Even imperfect CPR is better than doing nothing.
- Practice Regularly: Attend CPR training sessions to build confidence and improve your technique.
Common Mistakes to Avoid During an Emergency
- Not Calling for Help: Always ensure emergency services are contacted before starting CPR. Even if you’re confident in your skills, professional help is essential for the person’s survival.
- Incorrect Hand Placement: Placing your hands too high or too low on the chest can reduce the effectiveness of compressions. Aim for the center of the chest, between the nipples, to maximize blood flow.
- Inconsistent Compression Rate: Maintaining a steady rhythm of 100-120 compressions per minute is crucial. Use a metronome app or hum a song with the correct tempo to stay on track.
- Not Pushing Hard Enough: Shallow compressions may not circulate blood effectively. Push firmly to a depth of about 2 inches, even if it feels like you’re applying a lot of force.
- Stopping Too Soon: Fatigue is common, but stopping compressions early can drastically reduce the person’s chances of survival. If possible, switch with another bystander to maintain continuous compressions.
Unique Tips for Staying Calm and Effective
- Take a Deep Breath: Before starting CPR, take a moment to steady yourself. A calm mind helps you focus and act decisively.
- Visualize Success: Remind yourself that even imperfect CPR is better than doing nothing. Your actions can make a life-saving difference.
- Practice with Feedback Devices: Use CPR mannequins with built-in feedback to improve your technique. These devices can help you perfect compression depth and rhythm during practice sessions.
Where to Learn Hands-Only CPR
In-Person Training Options: American Heart Association and Red Cross Locations
The American Heart Association (AHA) and the Red Cross are two of the most trusted organizations offering in-person Hands-Only CPR training. These sessions are led by certified instructors who provide hands-on practice with mannequins, ensuring you master the correct technique.- American Heart Association: The AHA offers community classes at local training centers, schools, and hospitals. Their courses are designed for all skill levels, from beginners to healthcare professionals.
- Red Cross: The Red Cross provides CPR training at their regional offices and partner locations. They also offer blended learning options, combining online lessons with in-person practice.
Online Courses and Certifications for Convenience
For those with busy schedules, online CPR courses offer a flexible and convenient way to learn Hands-Only CPR. These programs often include video tutorials, interactive modules, and downloadable resources.- AHA Online Courses: The American Heart Association provides eLearning options like their “CPR Anytime” kits, which include instructional videos and a practice mannequin.
- Red Cross Online Training: The Red Cross offers online CPR certification courses that you can complete at your own pace. Some programs also include an option for in-person skill assessments.
- Other Platforms: Websites like ProCPR and National CPR Foundation provide affordable, accredited online courses with printable certifications.
Online Video Resources for CPR Training
Top-Rated Video Tutorials for Visual Learners
Online video tutorials are an excellent way for visual learners to grasp the steps of Hands-Only CPR. Platforms like YouTube and organization websites host high-quality, easy-to-follow videos that demonstrate proper techniques.- American Heart Association (AHA): The AHA’s official YouTube channel features concise, professional videos that break down the CPR process step by step. Their “Hands-Only CPR” tutorial is a must-watch for beginners.
- Red Cross: The Red Cross offers video demonstrations on their website and YouTube channel, covering everything from hand placement to compression rhythm.
- CPR Training Apps: Some apps, like “PulsePoint Respond,” include video guides that you can access on your phone for quick learning.
How to Choose Reliable and Accurate Resources
Not all online videos are created equal, so it’s important to select tutorials from trusted sources. Here’s how to ensure you’re learning from accurate and reliable content:- Check the Source: Prioritize videos from reputable organizations like the AHA, Red Cross, or certified medical professionals.
- Look for Certification: Videos linked to official CPR certification programs are more likely to provide accurate and up-to-date information.
- Read Reviews and Ratings: User feedback can help you identify the most helpful and well-produced tutorials.
- Focus on Clarity: Choose videos with clear instructions, visual demonstrations, and a professional tone. Avoid content that seems overly casual or lacks proper guidance.
Taking Action in Emergency Situations
Recognizing the Signs of Cardiac Arrest Quickly and Accurately
Cardiac arrest can happen suddenly and without warning, so recognizing the signs is critical. Look for these key indicators:- Unresponsiveness: The person does not respond to tapping or shouting.
- Abnormal Breathing: They are not breathing or are only gasping for air.
- Sudden Collapse: The individual may fall to the ground unexpectedly.
Overcoming Hesitation: How to Act Decisively and Confidently
It’s natural to feel nervous in an emergency, but hesitation can cost valuable time. Here’s how to overcome it and take action:- Remember the Simplicity of Hands-Only CPR: Focus on chest compressions—no need for rescue breaths or complex techniques. This simplicity makes it easier to act.
- Visualize the Steps: Mentally rehearse the process of calling for help, positioning your hands, and performing compressions. Preparation builds confidence.
- Focus on the Outcome: Remind yourself that your actions could save a life. Even imperfect CPR is better than doing nothing.
- Practice Regularly: Attend training sessions or watch video tutorials to reinforce your skills and reduce anxiety about performing CPR in real life.
Encouraging Others to Learn CPR
Spreading Awareness: Why Everyone Should Know Hands-Only CPR
Hands-Only CPR is a simple yet powerful skill that can save lives in critical moments. Cardiac arrest can happen anywhere—at home, in public, or at work—and often, the first person on the scene is a bystander. By knowing CPR, anyone can step in and make a life-saving difference. Statistics show that immediate CPR can double or triple survival rates, yet many people hesitate because they feel unprepared. Spreading awareness about the simplicity and effectiveness of Hands-Only CPR can empower more individuals to act confidently in emergencies. The more people trained, the greater the chances of survival for those experiencing cardiac arrest.Tips for Motivating Friends, Family, and Coworkers to Get Trained
- Share Real-Life Stories: Highlight inspiring examples of lives saved by bystanders performing CPR. Personal stories resonate and can motivate others to learn.
- Organize Group Training: Arrange a CPR class for your workplace, community, or family. Learning together makes the experience more engaging and less intimidating.
- Emphasize Accessibility: Point out that CPR training is widely available, affordable, and often takes just a few hours. Online options make it even more convenient.
- Focus on the Impact: Remind them that knowing CPR could save the life of someone they love. This personal connection often inspires action.
- Lead by Example: Share your own experience of learning CPR and how it has prepared you to handle emergencies. Your enthusiasm can encourage others to follow suit.
Frequently Asked Questions
Q: What is hands-only CPR?
A: Hands-only CPR is a simplified form of cardiopulmonary resuscitation (CPR) that involves only chest compressions, without mouth-to-mouth breaths. The American Heart Association recommends this technique for adults who suddenly collapse, are unresponsive, and are not breathing. It focuses on delivering high-quality chest compressions to maintain blood flow to the brain and vital organs.Q: How do I learn hands-only CPR?
A: You can learn hands-only CPR through resources like American Heart Association classes, online tutorials, and community training programs. These options provide step-by-step guidance on performing effective chest compressions, ensuring you’re prepared to act during a cardiac emergency.Q: Why is hands-only CPR effective?
A: Hands-only CPR is effective because it keeps oxygen-rich blood circulating to vital organs, increasing the chances of survival during sudden cardiac arrest. Studies by the American Heart Association show that pushing hard and fast at a rate of 100 to 120 compressions per minute can be as effective as traditional CPR, which includes rescue breaths.Q: When should I perform hands-only CPR?
A: Perform hands-only CPR when you see an adult or teen suddenly collapse, become unresponsive, and stop breathing. Before starting compressions, check the scene for safety and call 911 to ensure emergency help is on the way.Q: What is the correct hand placement for chest compressions?
A: Place the heel of one hand in the center of the victim’s chest, on the lower half of the breastbone. Stack your other hand on top, interlock your fingers, and keep your arms straight. Use your body weight to push down hard and fast, compressing the chest at least two inches deep at a rate of 100 to 120 compressions per minute.Q: Can anyone perform hands-only CPR?
A: Yes, anyone can perform hands-only CPR, even without formal training. If you feel confident, step in and start compressions. Bystander CPR can significantly improve a victim’s chances of survival until emergency medical services arrive. Remember, taking action is always better than doing nothing.Q: What should I do while waiting for emergency medical services?
A: Continue performing hands-only CPR until emergency responders arrive or the victim shows signs of life, such as breathing. If an automated external defibrillator (AED) is available, follow its instructions to help restore a normal heart rhythm.Q: Is hands-only CPR recommended for children?
A: Hands-only CPR is primarily recommended for adults and teens. For children and infants, conventional CPR with rescue breaths is usually advised. However, if you’re untrained or unsure, performing hands-only CPR is still better than doing nothing.Concluding Summary
Hands-Only CPR is a vital, life-saving skill that anyone can learn and apply in emergencies. By focusing on chest compressions, this technique simplifies the process, making it accessible to people of all backgrounds. From recognizing cardiac arrest to mastering compressions and spreading awareness, every step you take can make a difference. With resources like in-person training, online courses, and video tutorials, learning Hands-Only CPR has never been easier. By acting decisively and encouraging others to get trained, you contribute to a safer, more prepared community—one where lives can be saved with confidence and compassion.


 Login with Google
 Login with Facebook